singer handheld sewing machine manual

Your Singer handheld sewing machine manual serves as a comprehensive guide, detailing setup, operation, and troubleshooting. It ensures safe and effective use, catering to both beginners and experienced sewists.

Overview of the Singer Handheld Sewing Machine

The Singer handheld sewing machine is a portable, user-friendly device designed for quick repairs and small sewing projects. It is lightweight, compact, and easy to operate, making it ideal for household use. The machine typically includes features like adjustable tension, a rotating dial for needle control, and compatibility with standard sewing needles. Models such as the Sew Quick series are popular for their simplicity and versatility, allowing users to sew fabrics like cotton, polyester, and blends. It is powered by a DC adapter, ensuring safe and efficient operation.

Importance of Reading the Manual

Reading the Singer handheld sewing machine manual is essential for safe and effective operation. It provides critical safety guidelines, detailed instructions for threading, and troubleshooting tips to resolve common issues. Understanding the machine’s components and proper usage ensures optimal performance and prevents damage. The manual also offers maintenance advice to extend the machine’s lifespan. By following the manual, users can maximize their sewing experience and achieve professional results. It is a vital resource for both beginners and experienced sewists, covering everything needed to operate the machine confidently and efficiently.

Safety Precautions and Guidelines

Always read instructions before use to ensure safe operation. Follow basic safety precautions to avoid accidents and damage. Keep the machine out of reach of children and pets.

General Safety Instructions

Always read the manual before using your Singer handheld sewing machine. Keep children and pets away while operating. Avoid touching sharp parts like the needle. Ensure the machine is turned off when not in use. Use the correct adapter to prevent damage or electric shock. Never force the needle or press on the needle arm, as this can damage the mechanism. Keep the work area clean and well-lit to avoid accidents. Follow all safety guidelines to ensure safe and effective operation.

Electrical Safety Tips

Use the correct adapter with a 6V 800mA rating and ensure the plug diameter matches the machine’s inlet. Always check the adapter’s polarity to prevent damage. Avoid using damaged cords or adapters, as they can cause electrical hazards. Keep the machine away from water to prevent shock. Never touch electrical parts with wet hands. Ensure the machine is turned off before unplugging or adjusting parts. Follow these guidelines to maintain safety and prevent electrical accidents while operating your Singer handheld sewing machine.

Parts and Accessories of the Singer Handheld Sewing Machine

The Singer handheld sewing machine includes essential parts like the needle, bobbin, and tension dial. Accessories such as bobbins, needles, and adapters are also provided for smooth operation.

Key Components of the Machine

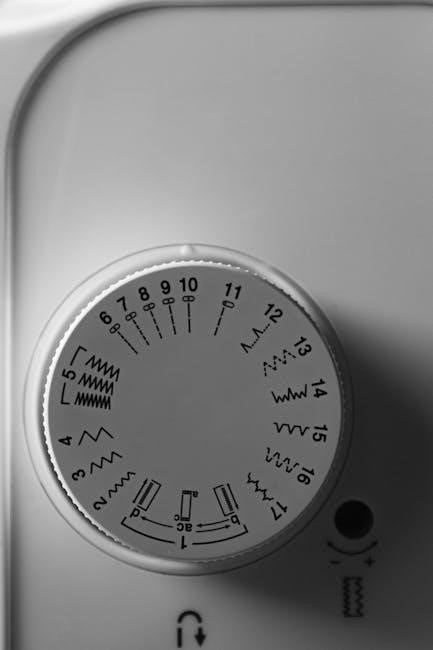
The Singer handheld sewing machine features a compact design with essential components like the needle arm, tension control dial, and bobbin case. The On/Off button and adapter inlet are conveniently located for easy operation. Additional accessories include replacement needles, bobbins, and a sewing kit. Understanding these components is crucial for proper machine setup and maintenance. Refer to the manual for detailed diagrams and descriptions to ensure optimal performance and longevity of your Singer handheld sewing machine.

Understanding the Control Panel

The control panel of the Singer handheld sewing machine is designed for intuitive operation. It features an On/Off button for power control, a tension dial to adjust stitch tightness, and an adapter inlet for power supply. The panel also includes a rotating dial for needle movement and a set screw for securing parts. Clear labels and a logical layout ensure easy navigation. Refer to the manual for detailed diagrams and descriptions to master the control panel’s functions and optimize your sewing experience with the Singer handheld machine.

Threading and Setting Up the Machine

Threading the Singer handheld sewing machine involves guiding the thread through the needle arm and tension control. Always wind the bobbin and set the machine to LOCK position before threading for precise stitching and efficient setup.

Step-by-Step Threading Guide

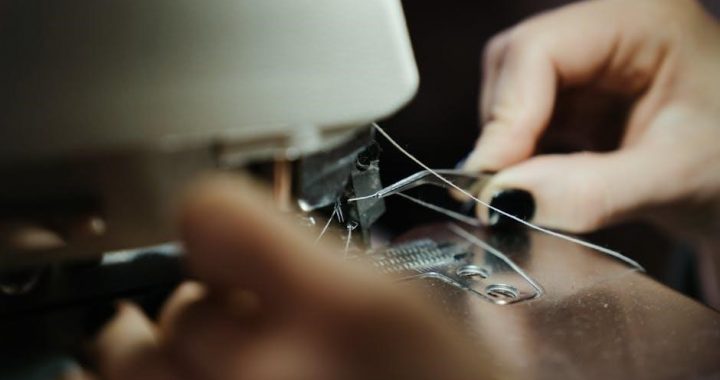
Start by ensuring the machine is in the LOCK position. Wind the bobbin and insert it into the bobbin case. Thread the machine by guiding the thread through the needle arm and tension control. Pull the thread gently to ensure it is seated properly. Insert the needle with the flat side facing forward. Rotate the dial to move the needle down to catch the bobbin thread. Pull excess thread to secure the stitch. Always refer to the manual for precise alignment and tension adjustment.

Winding and Installing the Bobbin

Begin by removing the bobbin from the bobbin case and unthreading it. Place the bobbin on the machine and wind the thread evenly, ensuring it does not overlap. Once wound, insert the bobbin pin into the designated hole on the machine. Gently pull the thread to secure it in place. Make sure the thread is seated properly in the tension spring. Replace the bobbin case and pull excess thread to ensure smooth stitching. Always refer to the manual for precise alignment and tension adjustment.

Basic Sewing Operations

Learn to operate your Singer handheld sewing machine with ease. Start by threading correctly, then sew straight lines, backstitch, and adjust fabric movement for precise stitching.

Starting Your First Stitch

Begin by ensuring the machine is properly threaded and the bobbin is installed. Pull 2 inches of thread through the needle. Place fabric under the needle, lower it gently, and start sewing slowly. Always keep extra thread loose to prevent breakage. If the needle jams, carefully remove the fabric without force. Follow these steps for smooth operation.

Adjusting Tension and Stitch Length

Proper tension ensures even stitching, while stitch length affects seam durability. Turn the tension dial to balance thread flow; too tight may cause fabric pulling, while too loose leads to loose stitches. For stitch length, use the control dial to select shorter stitches for delicate fabrics or longer ones for heavier materials. Always test adjustments on scrap fabric before sewing your final project to achieve the desired results.

Troubleshooting Common Issues

Address thread breakage by checking tension and needle condition. Clear jams by removing debris and rethreading. Consult the manual for detailed solutions to ensure optimal performance.

Resolving Thread Breakage Problems

Thread breakage often occurs due to improper threading, incorrect tension, or using the wrong needle type. To resolve this, rethread the machine following the manual’s guide, ensuring the thread is seated properly in the tension discs. Check the needle for damage or incorrect installation. Use a high-quality thread suitable for your fabric. If issues persist, consult the troubleshooting section for additional guidance to restore smooth sewing operation and prevent further breakage.

Fixing Jammed Needles and Bobbins

To resolve jammed needles or bobbins, first turn off the machine and unplug it for safety. Gently remove the bobbin case and bobbin, taking care not to pull forcefully. Use a small tool or tweezers to carefully free the needle from any tangled thread. Reinstall the bobbin correctly, ensuring it is seated properly and the thread is not crossed. If the issue persists, consult the manual for specific troubleshooting steps or contact Singer support for assistance. Regular maintenance can help prevent such jams.

Maintenance and Care Tips

Regularly clean the machine, oil moving parts, and store it in a dry place. This ensures optimal performance and extends the lifespan of your Singer handheld sewing machine.

Cleaning the Machine

Regular cleaning is essential for maintaining your Singer handheld sewing machine. Turn off and unplug the machine before cleaning. Use a soft brush to remove lint and debris from the needle area, bobbin compartment, and exterior surfaces. Avoid using harsh chemicals or abrasive materials that could damage the finish. Gently wipe down with a dry cloth to prevent moisture buildup. Ensure all parts are dry before storing or using the machine again to maintain optimal performance and longevity.

Oiling and Lubricating Moving Parts

Regular oiling is crucial for maintaining the smooth operation of your Singer handheld sewing machine. Apply a few drops of sewing machine oil to the hook race and other moving parts as indicated in the manual. Use a small brush to spread the oil evenly. Avoid over-lubrication, as it may attract lint and cause damage. Let the machine sit for a few minutes after oiling to allow the oil to penetrate. Gently run a few stitches on scrap fabric to test and ensure proper lubrication. Always use high-quality sewing machine oil for optimal performance.

Downloading and Accessing the Manual

Access the Singer handheld sewing machine manual by visiting Singer’s official website. Search for your model number or product name to download the PDF manual easily.

Official Singer Website Resources

The Singer official website provides easy access to downloadable manuals for all models, including the handheld sewing machine. Visit Singer’s official website and search for your specific model number or product name. The site offers a user-friendly interface to find and download PDF manuals instantly. Additionally, Singer provides customer support through email and live assistance for any queries. The website also features stitch guides, machine updates, and troubleshooting tips to ensure optimal performance of your sewing machine.

Alternative Sources for Manuals

If the official Singer website doesn’t have your manual, alternative sources like ManualsLib or ManualsOnline offer extensive libraries of sewing machine manuals. These platforms allow users to search and download free PDF versions of Singer handheld sewing machine manuals. Additionally, online marketplaces like eBay or Amazon may have third-party sellers offering digital or physical copies. Sewing forums and communities also often share manual links, providing a helpful resource for users seeking specific guides.

multiplying decimals pdf worksheet

Multiplying decimals PDF worksheets are essential tools for mastering decimal multiplication, offering structured practice aligned with educational standards like CCSS and TEKS. Designed for various skill levels, these resources cater to independent practice, homework, and differentiated instruction, ensuring comprehensive understanding and proficiency in decimal operations.

1.1 Importance of Practicing Decimal Multiplication

Practicing decimal multiplication is crucial for building foundational math skills, as it enhances understanding of place value and prepares students for advanced arithmetic. Regular practice fosters accuracy, speed, and confidence in handling real-world calculations, such as measurements, finances, and scientific applications. Worksheets provide structured exercises tailored to diverse learning needs, ensuring consistent improvement and mastery of decimal operations. They also help identify and correct common errors, reinforcing proper techniques and promoting long-term retention of mathematical concepts.

1.2 Overview of PDF Worksheets for Decimal Multiplication

PDF worksheets for decimal multiplication offer a variety of exercises tailored to different skill levels, from basic to advanced. Aligned with educational standards like CCSS and TEKS, they provide structured practice in multiplying decimals by whole numbers, decimals, and powers of ten. Available in formats such as standard, area model, and grid layouts, these worksheets cater to diverse learning styles. Customizable options allow teachers to create personalized tasks, ensuring targeted practice for specific needs. Ideal for independent study, homework, or classroom use, they support consistent skill development and mastery of decimal multiplication concepts.

Understanding the Concept of Multiplying Decimals

Mastering decimal multiplication involves understanding place value and precise decimal point placement. Worksheets align with CCSS and TEKS, offering structured exercises to build foundational skills and confidence.

2.1 Aligning with Educational Standards (CCSS and TEKS)

Multiplying decimals PDF worksheets are carefully designed to align with Common Core State Standards (CCSS) and Texas Essential Knowledge and Skills (TEKS). For instance, CCSS 5.NBT.B.7 emphasizes multiplying decimals by whole numbers and decimals, while TEKS 5.3.D focuses on understanding decimal operations. These worksheets ensure students meet specific learning objectives, providing structured exercises and problem sets that cater to diverse learning needs and skill levels. By adhering to these standards, educators can ensure comprehensive understanding and mastery of decimal multiplication concepts.

2.2 Differentiated Practice Levels for Various Learning Needs

Multiplying decimals PDF worksheets offer differentiated practice levels to cater to diverse learners. Beginners can start with whole numbers and simple decimals, while advanced students tackle multi-digit decimals and word problems. Worksheets are structured with increasing difficulty, ensuring a smooth progression of skills. This approach allows educators to tailor resources to individual needs, providing extra support or challenges as required. Inclusive formats, such as standard form, area models, and grid models, further enhance accessibility for varied learning styles and preferences.

Benefits of Using Multiplying Decimals Worksheets

Multiplying decimals worksheets provide structured practice, enhancing accuracy and fluency in decimal operations. They serve as valuable tools for independent study, homework, and reinforcing classroom lessons effectively.

3.1 Independent Practice and Homework Tasks

Multiplying decimals worksheets offer an excellent way to reinforce learning through independent practice and homework. They provide a variety of problems, from simple to complex, allowing students to apply their skills in different contexts. With options for both whole numbers and decimal multiplication, these resources help students build confidence and accuracy. Additionally, many worksheets include word problems, encouraging real-world application of decimal multiplication. Parents and educators can utilize these tools to monitor progress and ensure a solid understanding of the concept.

3.2 Tips and Strategies for Accurate Decimal Multiplication

To ensure accuracy in decimal multiplication, students should first multiply as if decimals were whole numbers, then place the decimal point correctly. Counting decimal places in both factors helps determine the product’s decimal placement. Using visual models, like area or grid methods, can enhance understanding. Converting decimals to whole numbers by multiplying with powers of ten simplifies calculations. Regular practice with worksheets and real-world applications reinforces these strategies, building confidence and reducing errors in decimal multiplication tasks.

Real-World Applications of Decimal Multiplication

Decimal multiplication is crucial in everyday scenarios, such as calculating measurements, budgeting, and scaling recipes. It also applies to converting units and solving scientific problems, making practice essential for real-world success.

4.1 Everyday Scenarios Involving Decimal Multiplication

Decimal multiplication appears in daily activities like cooking, where scaling recipes requires adjusting ingredient quantities. Shopping involves calculating costs of items priced per unit, while home improvement projects demand precise measurements for materials. Financial planning, such as calculating interest or investments, also relies on decimal multiplication. Additionally, converting units like liters to gallons or kilograms to pounds is common in real-life situations, emphasizing the practical necessity of mastering this skill through targeted practice with PDF worksheets.

4.2 Converting Units and Measurements

Converting units and measurements often involves decimal multiplication, such as converting Celsius to Fahrenheit or liters to gallons. For instance, converting degrees Fahrenheit to Celsius requires multiplying by a decimal fraction after subtraction. Similarly, scaling recipes in cooking or calculating material quantities in construction demands precise decimal multiplication. These real-world applications highlight the importance of mastering decimal operations through dedicated practice, making PDF worksheets invaluable for building proficiency in unit conversion tasks.

Common Errors in Multiplying Decimals

Common errors in multiplying decimals often involve incorrect placement of the decimal point and miscounting decimal places, leading to inaccurate results. Regular practice helps minimize these mistakes.

5.1 Placement of the Decimal Point

One of the most frequent errors when multiplying decimals is the incorrect placement of the decimal point in the final product. This often occurs due to miscounting the total number of decimal places in the multiplicand and multiplier. For example, multiplying 4.2 (one decimal place) by 3.1 (one decimal place) should result in a product with two decimal places. However, students often forget to count the places accurately, leading to an incorrectly placed decimal. Regular practice with PDF worksheets helps students develop this critical skill, ensuring they consistently place the decimal point correctly. Additionally, using visual aids like grids or area models can enhance understanding and reduce errors. By mastering the placement of the decimal point, students build a stronger foundation for more complex decimal operations in the future.

5.2 Miscounting Decimal Places

Miscounting decimal places is a prevalent error in decimal multiplication, often leading to incorrect results. Students may overlook or miscalculate the total number of decimal places in the numbers being multiplied. For instance, multiplying 2.5 (one decimal place) by 3.8 (one decimal place) requires the product to have two decimal places. However, rushing through problems or lack of attention can result in misplacement. To address this, educators recommend using visual aids like place value charts or highlighting decimal places before calculation. Regular practice with PDF worksheets designed to focus on decimal placement helps students develop precision and consistency in their calculations, reducing errors over time and improving overall math proficiency.

Step-by-Step Guide to Multiplying Decimals

Multiply decimals by treating them as whole numbers, then count the total decimal places in both numbers to correctly place the decimal point in the product.

6.1 Multiplying Decimals by Whole Numbers

To multiply a decimal by a whole number, ignore the decimal point and multiply as if both numbers were whole numbers. After obtaining the product, count the total number of decimal places in the original decimal number and place the decimal point in the correct position in the product. For example, multiplying 4.2 by 3 involves multiplying 42 by 3 to get 126, then placing the decimal to get 12.6. This method ensures accuracy and aligns with standards like CCSS and TEKS, making it a reliable technique for mastering decimal multiplication.

6.2 Multiplying Decimals by Decimals

Multiplying two decimals involves treating them as whole numbers initially. Multiply the numbers without considering the decimal points, then count the total number of decimal places in both original numbers. Place the decimal point in the product so that the number of decimal places matches the total counted. For example, multiplying 2.5 by 0.4 involves multiplying 25 by 4 to get 100, then placing the decimal to get 10.0. This method ensures precision and is widely used in educational resources to teach decimal multiplication effectively.

Printable PDF Worksheets for Decimal Multiplication

Printable PDF worksheets offer convenient, customizable practice for decimal multiplication, catering to diverse learning needs. They align with educational standards, providing clear structures and varied exercises for mastery.

7.1 Features of Printable Decimal Multiplication Worksheets

Printable decimal multiplication worksheets are designed with diverse features to enhance learning. They include varied problem sets, such as multiplying decimals by whole numbers, decimals, and powers of ten. Many worksheets incorporate visual models, like area and grid models, to aid understanding. Additionally, they often come with answer keys for self-assessment and are customizable to suit different skill levels. Some resources offer multiple formats, including standard, area model, and grid-based layouts, ensuring they cater to various learning preferences and needs. These features make them versatile tools for both classroom and home use, supporting independent practice and differentiated instruction effectively. The ability to download them as PDFs ensures easy access and printing, making them a convenient option for educators and parents alike. Overall, these worksheets are structured to promote mastery of decimal multiplication through engaging and structured exercises.

7.2 Customizing Worksheets for Specific Needs

Printable decimal multiplication worksheets can be tailored to meet specific learning requirements. Educators can choose the number of decimal places, problem formats, and difficulty levels to suit individual or classroom needs. Customization options include selecting whole number or decimal multipliers, varying problem sets, and incorporating visual aids like area models. Additionally, worksheets can be adjusted to focus on specific skills, such as multiplying by powers of ten or solving word problems. This flexibility ensures that learners receive targeted practice, enhancing their mastery of decimal multiplication concepts. The ability to create multiple versions also helps prevent copying, making them ideal for assessments and independent practice.

Word Problems Involving Decimal Multiplication

Engage students with real-world word problems that require decimal multiplication skills. These scenarios, like calculating costs or measurements, enhance critical thinking and practical application abilities effectively.

8.1 Identifying and Solving Real-World Word Problems

Word problems involving decimal multiplication simulate real-life scenarios, such as shopping, cooking, or engineering. Students learn to interpret situations, extract relevant numbers, and apply multiplication skills. For instance, calculating the cost of items in bulk or determining ingredients for a recipe. These problems enhance problem-solving abilities by connecting math to practical contexts, fostering a deeper understanding of decimal operations. Through consistent practice, students build confidence in tackling diverse, complex problems effectively.

8.2 Encouraging Critical Thinking Through Word Problems

Word problems in decimal multiplication worksheets encourage critical thinking by challenging students to apply mathematical skills to real-world scenarios. These problems require analyzing situations, identifying relevant numbers, and determining the appropriate operation. By connecting math to practical contexts, such as calculating costs or quantities, students develop problem-solving strategies and logical reasoning. This approach fosters a deeper understanding of decimals and prepares learners for complex, open-ended challenges in academics and everyday life.

Mastering decimal multiplication through PDF worksheets enhances mathematical fluency and problem-solving skills, essential for real-world applications and academic success. Consistent practice fosters confidence and accuracy in handling decimals.

9.1 Summarizing the Importance of Decimal Multiplication Practice

Practicing decimal multiplication is crucial for building a strong foundation in mathematical operations, enabling students to handle real-world calculations with precision. Worksheets provide structured exercises that align with educational standards, ensuring comprehensive skill development. Regular practice helps students master decimal placement, reduce errors, and apply concepts to word problems and unit conversions. By reinforcing these skills, learners gain confidence and fluency, preparing them for advanced mathematical challenges in algebra, geometry, and data analysis.

9.2 Encouraging Continued Practice for Mastery

Consistent practice is key to achieving mastery in decimal multiplication. Regular use of PDF worksheets helps reinforce skills, reduce errors, and build confidence. Encourage learners to explore different practice formats, such as digital tools or traditional worksheets, to keep their engagement high. By dedicating time each day to practice, students will develop long-term retention and fluency in decimal operations, preparing them for real-world applications and more complex mathematical challenges.

i-485 cover letter pdf

An I-485 cover letter is a crucial document accompanying Form I-485‚ providing a clear overview of the application and its supporting documents for adjustment of status․

1․1 Purpose of the Cover Letter

The purpose of an I-485 cover letter is to provide a concise summary of the application‚ list all enclosed documents‚ and explain the basis for the adjustment of status․ It helps USCIS officers efficiently review the submission by organizing the application materials and highlighting key information․ A well-crafted cover letter ensures clarity and professionalism‚ making the application process smoother for both the applicant and the reviewing authority․

1․2 Importance of a Well-Structured Cover Letter

A well-structured I-485 cover letter ensures clarity and professionalism‚ making it easier for USCIS officers to review the application․ It organizes documents‚ highlights eligibility‚ and provides a clear overview of the submission․ A structured cover letter reduces the risk of delays or rejections by ensuring all required information is included and presented logically․ It also demonstrates the applicant’s attention to detail and commitment to a complete and accurate application‚ enhancing the overall professionalism of the submission․

What is Form I-485?

Form I-485 is the official USCIS application for adjusting immigration status to become a lawful permanent resident‚ commonly known as the Green Card application․

2․1 Adjustment of Status Explained

Adjustment of Status (AOS) allows eligible individuals to transition from a temporary visa to lawful permanent residency in the U․S․ without leaving the country․ It is a pathway to obtaining a Green Card and is initiated by filing Form I-485․ Applicants must meet specific eligibility criteria‚ such as having a valid visa or qualifying under certain categories․ The process involves submitting Form I-485 along with required documents‚ which must be meticulously organized․

2․2 Eligibility Criteria for Filing Form I-485

To be eligible for Form I-485‚ applicants must meet specific criteria‚ such as lawful entry into the U․S․‚ maintaining valid visa status‚ or qualifying under categories like family sponsorship‚ employment‚ or humanitarian programs․ Applicants must also not have engaged in activities that violate immigration laws․ Each category has unique requirements‚ and meeting these standards is essential for a successful application․

Structure of an I-485 Cover Letter

A well-structured I-485 cover letter includes applicant information‚ application details‚ and a list of enclosed documents‚ ensuring clarity and organization for USCIS review․

3․1 Applicant Information

The cover letter begins with the applicant’s full name‚ mailing address‚ phone number‚ and Alien Registration Number (A-number) if applicable․ It clearly states the purpose of the letter‚ such as applying for adjustment of status or filing concurrently with Form I-130․ This section ensures USCIS can identify the applicant and understand the application’s intent at a glance․

3․2 Application Details and Enclosures

This section lists the application details and enclosures‚ ensuring clarity and organization․ It includes bullet points of supporting documents like Form I-485‚ photos‚ birth/visa records‚ marriage certificates‚ and Form I-864 affidavit of support․ Each item is clearly referenced‚ making it easy for USCIS to review․ The cover letter should also mention additional relevant paperwork‚ such as employment verification or medical records‚ to ensure completeness․

3․3 Closing Statement and Signature

The closing statement expresses gratitude to USCIS for reviewing the application․ It reiterates the applicant’s eligibility and commitment to complying with U․S․ immigration laws․ The signature block must include the applicant’s full name‚ contact information‚ and the date․ If signed by an attorney or preparer‚ their name‚ contact details‚ and authority to sign must be included․ This section ensures accountability and professionalism‚ adhering to USCIS requirements․

How to Download an I-485 Cover Letter PDF

Visit official USCIS websites‚ legal aid platforms‚ or trusted immigration blogs to download free I-485 cover letter templates in PDF format for easy customization and submission․

4․1 Sources for Official Templates

Official I-485 cover letter templates can be sourced from the USCIS website‚ legal aid platforms like the National Immigrant Justice Center‚ and trusted immigration blogs․ These platforms offer free‚ downloadable PDF templates tailored for various applications‚ including family-based‚ employment-based‚ and VAWA cases․ Many sites provide customizable templates‚ ensuring compliance with USCIS guidelines and streamlining the application process․ Always verify the source’s credibility to avoid errors or misinformation in your submission․

4․2 Step-by-Step Download Process

Visit the USCIS website or trusted platforms like the National Immigrant Justice Center․ Locate the I-485 cover letter template section․ Select the appropriate template based on your application type (e․g․‚ family-based or employment-based)․ Download the template in PDF format․ Use a PDF editor to fill in your details․ Save and print the completed letter․ Ensure all information aligns with USCIS guidelines before submission․

Sample I-485 Cover Letter Templates

Explore various sample I-485 cover letter templates tailored for family-based‚ employment-based‚ and VAWA-based adjustments of status․ These examples provide a clear structure and content guide for applicants․

5․1 Family-Based Adjustment of Status

A family-based I-485 cover letter typically accompanies applications for spouses‚ parents‚ or children of U․S․ citizens or green card holders․ The letter should list all enclosed documents‚ such as marriage certificates‚ birth certificates‚ and Form I-130․ A sample template for family-based adjustment ensures clarity and organization‚ helping applicants present their case professionally and efficiently to USCIS for a smoother processing experience․

5․2 Employment-Based Adjustment of Status

An employment-based I-485 cover letter is used when applying for a green card through a job offer or employer sponsorship․ The letter should include Form I-140 approval notice‚ labor certification‚ and supporting documents like employment verification․ A sample template for employment-based cases ensures all required paperwork is organized‚ making it easier for USCIS to review the application efficiently and accurately․

5․3 VAWA-Based Adjustment of Status

A VAWA-based I-485 cover letter is used by applicants seeking adjustment of status under the Violence Against Women Act․ The letter should include Form I-360 approval‚ proof of eligibility‚ and supporting documents like police reports or court orders․ A sample template for VAWA cases ensures proper organization of evidence‚ making it easier for USCIS to process the application and verify the applicant’s qualifications for relief under VAWA protections․

Writing Tips for an Effective Cover Letter

Write clearly and concisely‚ ensuring accuracy of information․ Use proper formatting and avoid errors․ Include all required details and organize them logically for a professional presentation․

6․1 Clarity and Conciseness

A clear and concise cover letter is essential for an effective I-485 application․ Use straightforward language to outline the purpose and details of your submission․ Avoid unnecessary complexity and ensure each paragraph addresses a specific aspect of your application․ This approach enhances readability and helps USCIS officers quickly understand your case․ Always maintain a professional tone while keeping the content succinct and relevant․

6․2 Accuracy of Information

Ensuring accuracy in your I-485 cover letter is critical to avoid delays or rejections․ Double-check all personal details‚ application types‚ and document references․ Verify dates‚ names‚ and petition numbers for consistency with your forms․ Include only relevant documents and clearly list them to ensure transparency․ Accuracy demonstrates attention to detail and professionalism‚ enhancing the credibility of your application․ Always review your letter before submission to correct any errors or omissions․

Common Mistakes to Avoid

Common mistakes include incomplete or missing information‚ incorrect formatting‚ and missing signatures․ Ensure all details are accurate and documents are properly enclosed to avoid delays or rejection․

7․1 Incomplete or Missing Information

Incomplete or missing information is a common mistake that can delay processing․ Ensure all required fields are filled accurately‚ and all supporting documents are included․ Missing forms‚ photos‚ or signatures can lead to rejection․ Double-check for birth certificates‚ marriage records‚ and financial documents․ Use a checklist based on USCIS guidelines to verify completeness․ Careful preparation is essential to avoid such errors and ensure smooth processing of the application․

7․2 Incorrect Formatting or Signatures

Incorrect formatting or signatures can lead to delays or rejection of the I-485 application․ Ensure the cover letter adheres to USCIS guidelines‚ using proper font size‚ margins‚ and structure․ Signatures must be legible and dated‚ avoiding electronic or typed names․ Always check for formatting consistency and ensure all signatories are included․ Proper formatting and accurate signatures are critical for a complete and professional submission․

Editing and Customizing the Cover Letter

Edit the I-485 cover letter using PDF editors to ensure accuracy and compliance with USCIS guidelines․ Customize the template to reflect your specific application details and needs․

8․1 Using PDF Editors

Utilizing PDF editors simplifies the process of customizing your I-485 cover letter․ These tools allow you to edit text fields‚ add signatures‚ and insert additional details directly within the PDF․ Ensure the software maintains the document’s formatting and integrity․ Popular options include Adobe Acrobat‚ PrintFriendly‚ and online platforms designed for legal document editing․ Always preview changes before finalizing to catch errors or formatting issues․

8․2 Ensuring Compliance with USCIS Guidelines

Compliance with USCIS guidelines is essential when preparing the cover letter․ Ensure the document includes the applicant’s name‚ A-number‚ and a detailed list of all enclosed documents․ Each item should be clearly labeled and match the requirements outlined in the USCIS instructions․ This ensures the application is processed efficiently and avoids delays․ Always refer to the official USCIS website or resources for the most up-to-date information․

Submitting the Cover Letter with Form I-485

Submit the cover letter with Form I-485‚ ensuring all required documents are included․ Verify the mailing address and double-check the application package for completeness before mailing․

9․1 Checklist of Required Documents

A detailed checklist ensures all necessary documents are included with the I-485 application․ This typically includes Form I-485‚ supporting documents like photos‚ birth certificates‚ marriage certificates‚ Form I-864‚ and employment authorization forms․ The cover letter should list each enclosed document‚ verifying that all requirements are met․ Double-checking the checklist prevents missing items‚ which could delay processing․ Ensure every form is properly completed and signed before submission․

9․2 Filing Process and Mailing Address

The I-485 application must be filed with the appropriate USCIS service center or field office․ The filing process requires submitting the completed Form I-485‚ the cover letter‚ and all supporting documents․ The mailing address varies based on the applicant’s eligibility category and geographic location․ It is essential to verify the correct address on the USCIS website to ensure timely processing․ Always include a checklist and ensure the application is properly signed before mailing․

Additional Resources

Access official USCIS guidelines‚ legal consultation services‚ and downloadable templates for I-485 cover letters online․ These resources provide detailed instructions and examples to assist with your application․

10․1 USCIS Guidelines and Instructions

The USCIS website offers official guidelines and instructions for preparing an I-485 cover letter‚ including templates and examples․ These resources provide detailed information on required documents‚ formatting‚ and submission processes․ Ensure compliance with USCIS standards to avoid delays or rejection․ Use PDF editors to customize templates accurately‚ ensuring all information aligns with application requirements․ Referencing official materials helps maintain consistency and accuracy in your submission․

10․2 Legal Assistance and Consultation

Consulting with immigration attorneys or legal experts ensures accurate preparation of the I-485 cover letter and application․ Organizations like the National Immigrant Justice Center offer guidance and resources․ Legal assistance helps navigate complex requirements‚ avoiding errors that could delay or reject your application․ Experts review documents for compliance‚ improving the likelihood of approval․ Seek professional advice if unsure about any aspect of the process to ensure a well-prepared submission․

A well-prepared I-485 cover letter ensures clarity‚ accuracy‚ and compliance with USCIS guidelines‚ enhancing the likelihood of a successful application and avoiding delays in the process․

11․1 Final Checklist for Submission

Ensure all required documents are neatly organized‚ including Form I-485‚ supporting evidence‚ and the signed cover letter․ Verify completeness‚ accuracy‚ and compliance with USCIS guidelines․ Double-check signatures‚ dates‚ and correct mailing address․ Include a copy of Form I-797C (if applicable) and confirm all fees are paid․ Properly package everything to avoid delays․ Review one last time before submission to ensure no errors or omissions remain․

11․2 Importance of Proper Preparation

Proper preparation of the I-485 cover letter and application ensures accuracy‚ completeness‚ and compliance with USCIS guidelines․ A well-structured and thorough submission reduces delays and requests for additional evidence․ It demonstrates a responsible and serious approach to the process‚ enhancing the likelihood of a smooth and timely approval․ Avoiding errors and omissions is critical to maintaining the integrity of your adjustment of status application․

singer fashion mate 3342 manual

Overview of the Singer Fashion Mate 3342 Manual

The Singer Fashion Mate 3342 manual provides a comprehensive guide for optimal usage, covering setup, features, threading, maintenance, and troubleshooting, ensuring efficient operation of the sewing machine.

The Singer Fashion Mate 3342 is an automatic sewing machine designed for versatility and ease of use. It offers 29 built-in stitch options, automatic one-step buttonhole creation, and a horizontal rotating hook for smooth fabric handling. Compact and lightweight, it measures 164mm in width, 74mm in depth, and 130mm in height, weighing 14,000g. This machine is ideal for both beginners and experienced sewists, providing efficient performance for a variety of sewing projects, from basic repairs to intricate designs.

1.2 Importance of the Manual for Optimal Usage

The Singer Fashion Mate 3342 manual is essential for unlocking the machine’s full potential. It provides clear, step-by-step instructions for threading, operating, and maintaining the sewing machine. The manual covers troubleshooting common issues, ensuring safety, and maximizing efficiency. By following the guide, users can avoid errors, extend the machine’s lifespan, and explore advanced features like automatic buttonholes and stitch customization. It serves as a valuable resource for both beginners and experienced sewists, offering detailed insights to enhance their sewing experience.

Key Features and Specifications of the Singer Fashion Mate 3342

The Singer Fashion Mate 3342 is an automatic sewing machine with 29 stitch options, automatic buttonhole creation, and a compact, lightweight design for versatility and efficiency.

2.1 Detailed Specifications of the Sewing Machine

The Singer Fashion Mate 3342 measures 164mm in width, 74mm in depth, and 130mm in height, weighing 14000g. It features 29 built-in stitch options, including automatic buttonhole creation. The machine supports a maximum stitch length of 4mm and width of 6mm, with automatic thread cutting for convenience. Designed for versatility, it is suitable for both beginners and experienced sewists. Key components include a horizontal rotating hook, automatic thread cutter, and built-in needle threader for streamlined sewing operations.

2.2 Special Features and Capabilities

The Singer Fashion Mate 3342 boasts automatic thread cutting, free-arm sewing, and a built-in needle threader for convenience. It features 29 stitch options, including decorative and utility stitches, with automatic one-step buttonhole creation. The machine also has a horizontal rotating hook and automatic bobbin winding, ensuring smooth operation. Its automatic tension control and adjustable stitch length and width provide versatility for various fabrics. These features make it ideal for both beginners and experienced sewists, offering efficiency and precision for a wide range of sewing projects.

Setup and Threading Instructions

The Singer Fashion Mate 3342 setup involves unpacking, plugging in, and preparing the machine. Threading is simplified with color-coded pathways and automatic bobbin winding. Proper thread tension ensures smooth stitching for optimal performance.

3.1 Step-by-Step Guide to Threading the Machine

To thread the Singer Fashion Mate 3342, start by placing the thread spool on the spool pin; Guide the thread through the upper tension guide, then through the take-up lever. Next, insert the thread into the needle’s eye. For bobbin threading, place the bobbin on the winder, pull thread through the bobbin’s hole, and wind. Proper threading ensures smooth stitching and prevents jams. Follow the color-coded pathways for bobbin winding and sewing. Ensure the thread is taut but not too tight for optimal performance. Refer to the manual for detailed visuals if needed.

3.2 Correctly Setting Up the Machine for First Use

Before first use, ensure the Singer Fashion Mate 3342 is placed on a stable, flat surface. Carefully unpack and inspect for damage. Familiarize yourself with the principal parts, including the thread tension dial, take-up lever, and presser foot. Plug in the machine and ensure the power switch is off. Use the color-coded threading guide for proper thread routing. Wind the bobbin as instructed, ensuring it is evenly filled. Always unplug the machine before cleaning or servicing. Refer to the manual for detailed setup visuals and safety precautions.

Maintenance and Troubleshooting

Regular maintenance ensures longevity. Clean lint, oil moving parts, and check thread tension. Troubleshoot issues like uneven stitches or thread jams by re-threading or adjusting settings as needed.

4.1 Regular Maintenance Tips for Longevity

Regular maintenance is crucial to ensure the Singer Fashion Mate 3342 sewing machine operates smoothly. Clean lint and debris from the bobbin area and tension discs. Lightly oil the machine’s moving parts as recommended. Check and adjust thread tension regularly to prevent uneven stitches. Inspect the needle and replace it if damaged. Store the machine in a dry, cool place and unplug it when not in use. Following these tips extends the machine’s lifespan and maintains its performance.

4.2 Common Issues and Troubleshooting Solutions

Common issues with the Singer Fashion Mate 3342 include thread bunching, uneven stitches, or the machine not turning on. Check thread tension and ensure proper threading. Clean lint from the bobbin area and oil moving parts if sticky. For power issues, verify the outlet and ensure the plug is secure. If stitches are uneven, adjust the tension or replace the needle; Consult the manual for detailed solutions to ensure optimal performance and resolve issues efficiently.

The Manual’s Content and Structure

The Singer Fashion Mate 3342 manual is comprehensive, featuring step-by-step instructions, clear graphics, and detailed sections on setup, operation, and maintenance for seamless user experience.

5.1 Understanding the Layout of the Manual

The Singer Fashion Mate 3342 manual is organized into clear sections for easy navigation. It begins with an introduction to the machine’s features, followed by detailed parts identification. The manual includes step-by-step guides for threading, sewing, and maintenance, along with troubleshooting tips. Safety precautions and warranty information are also highlighted. Visual aids, such as diagrams and charts, are provided to simplify complex procedures. The logical structure ensures users can quickly find the information they need, making the manual a valuable resource for both beginners and experienced sewists.

5.2 Navigating the Instructions for Different Operations

The manual is divided into sections tailored for specific tasks, making it easy to navigate. Detailed instructions for threading, sewing, and maintenance are clearly separated. Visual guides, such as diagrams and flowcharts, help users understand complex operations. The troubleshooting section is organized by common issues, providing quick solutions. Additionally, the manual includes a table of contents and an index for rapid access to specific topics. This structured approach ensures users can efficiently find guidance for any operation, enhancing their sewing experience.

Safety Precautions and Guidelines

Always unplug the machine after use and before cleaning or servicing. Ensure the machine is used by adults only and kept out of children’s reach. Regular maintenance and proper handling are essential for safe operation.

6;1 Essential Safety Measures When Using the Machine

To ensure safe operation of the Singer Fashion Mate 3342, always unplug the machine after use and before cleaning or servicing. Keep the machine out of children’s reach and avoid using it near water or in humid environments. Proper handling and regular maintenance are crucial to prevent accidents. Always follow the manufacturer’s guidelines for threading, presser foot usage, and needle replacement. Never touch electrical components with wet hands, and avoid sewing loose clothing that could get caught in moving parts. Prioritize safety to enjoy a secure sewing experience.

6;2 Precautions Before Cleaning or Servicing

Before cleaning or servicing the Singer Fashion Mate 3342, always unplug the machine to avoid electrical hazards. Use a soft, dry cloth to wipe external surfaces, avoiding water or harsh chemicals. Never oil internal components unless specified in the manual. Remove any loose debris with a brush, but avoid touching sensitive mechanical parts; Ensure all accessories are detached and the machine is cool before proceeding. Following these precautions ensures safety and preserves the machine’s functionality for optimal performance.

Singer’s Customer Support and Resources

Singer offers comprehensive support, including online resources, email assistance, and a dedicated hotline. Users can access manuals, troubleshooting guides, and additional learning materials for enhanced sewing experiences.

7.1 Available Support Channels for Users

Singer provides multiple support channels to assist users of the Fashion Mate 3342. These include a dedicated website (www.singerco.com) with downloadable manuals, email support at email160;protected, and a toll-free hotline (1-800-474-6437) for North America. Additionally, live one-on-one assistance is available from Singer Sewing Assistants. Users can also access troubleshooting guides, instructional resources, and FAQs online. These resources ensure that users can resolve issues quickly and make the most of their sewing machine’s features and capabilities.

7.2 Additional Resources for Enhanced Learning

The Singer Fashion Mate 3342 manual is complemented by additional resources to enhance user experience. These include downloadable PDF guides, video tutorials, and community forums where users can share tips and solutions. Singer also provides a detailed user guide with step-by-step instructions, ensuring users can master various sewing techniques. These resources are designed to help users maximize their machine’s potential, troubleshoot common issues, and explore advanced sewing capabilities, making the learning process seamless and enjoyable.

business statistics communicating with numbers pdf

Business statistics transforms raw data into actionable insights, enabling effective decision-making. This guide emphasizes clear communication, helping professionals convey complex data to stakeholders effectively and efficiently.

1.1 Overview of the Book and Its Importance

Business Statistics: Communicating with Numbers, 4th Edition, by Sanjiv Jaggia and Alison Kelly, published by McGraw-Hill Higher Education, serves as a comprehensive guide for understanding and applying statistical methods in business contexts. With its emphasis on transforming raw data into actionable insights, this book equips students and professionals with the skills to communicate effectively, influencing stakeholders and driving informed decision-making. ISBNs: 9781260716306 (print) and 9781264218882 (eText).

1.2 Key Features of the 4th Edition

The 4th edition of Business Statistics: Communicating with Numbers offers enhanced digital tools, including access to McGraw-Hill Connect, providing interactive exercises and case studies. It bridges theory and practice, helping students master statistical concepts and communicate data effectively in business contexts. New features include updated datasets, real-world applications, and improved visuals to aid comprehension; This edition ensures students are well-prepared for future challenges in business analytics.

The Role of Statistics in Business Decision-Making

Statistics empower businesses to transform raw data into actionable insights, enabling informed decision-making. It provides a solid foundation for identifying trends, optimizing processes, and driving success through data-driven choices.

2.1 Transforming Raw Data into Actionable Insights

Business statistics converts raw data into meaningful insights, enabling organizations to make informed decisions. By analyzing trends and patterns, companies can optimize operations, enhance strategies, and achieve sustainable growth. Effective communication of these insights ensures stakeholders understand and act upon the data, driving success in competitive markets. This process is crucial for aligning business goals with actionable outcomes.

2.2 The Importance of Effective Communication in Business Statistics

Effective communication is vital in business statistics, as it bridges the gap between data analysis and decision-making. Clear presentation of numbers ensures stakeholders grasp insights quickly. By using charts, graphs, and concise language, professionals can convey complex data simply. This fosters trust, collaboration, and informed decisions, ultimately driving business success and stakeholder confidence.

Common Sampling Methods in Business Statistics

Common sampling methods include convenience sampling and voluntary response sampling. These approaches help gather data efficiently, enabling businesses to make informed decisions based on representative insights.

3.1 Convenience Sampling and Its Implications

Convenience sampling involves collecting data from easily accessible groups, offering cost and time efficiency. However, it risks bias and may not represent the broader population accurately, as highlighted in Business Statistics: Communicating with Numbers. This method is practical for initial insights but can lead to overestimation or underestimation of population parameters, impacting decision-making quality.

3.2 Voluntary Response Sampling: Advantages and Drawbacks

Voluntary response sampling allows participants to choose involvement, offering flexibility and lower costs. However, it often leads to self-selection bias, as only motivated individuals may respond, skewing results. This method is useful for exploratory studies but lacks representativeness, potentially misrepresenting the population, as discussed in Business Statistics: Communicating with Numbers. It requires careful interpretation to avoid misleading conclusions.

Practical Applications of Business Statistics

Business statistics empowers organizations to make data-driven decisions, predict market trends, and optimize operations, ensuring informed strategies and measurable outcomes in competitive environments.

4.1 Using Numbers to Influence Stakeholders

Presenting statistical insights clearly and persuasively is crucial for influencing stakeholders. By leveraging data to tell a story, professionals can align business goals with stakeholder expectations. Clear, precise communication ensures stakeholders grasp key findings, making informed decisions. Ethical presentation of data builds trust, fostering long-term relationships and organizational success.

4.2 Case Studies in Effective Statistical Communication

Real-world examples illustrate how businesses successfully communicate statistical insights. Case studies reveal strategies for transforming data into actionable strategies, highlighting clarity and ethical practices. These narratives demonstrate how clear presentation and data interpretation lead to informed decisions, showcasing the power of statistics in driving business outcomes and stakeholder engagement.

The Future of Business Statistics and Analytics

The future of business statistics lies in innovation, AI, and big data analytics. Emerging trends emphasize advanced tools and technologies to enhance decision-making processes and data interpretation.

5.1 Emerging Trends in Data Analysis

Emerging trends in data analysis include the integration of AI, machine learning, and big data analytics. These technologies enable faster processing of complex datasets, uncovering deeper insights. Predictive analytics and visualization tools are becoming essential for forecasting and decision-making. The rise of real-time data analysis further enhances business agility, allowing organizations to respond promptly to market changes and customer needs, driving innovation and efficiency in statistical communication and strategy development.

5.2 The Role of Technology in Modern Business Statistics

Technology plays a pivotal role in modern business statistics, enhancing data analysis and communication. Tools like Excel, Python, R, and Tableau enable efficient data visualization and modeling. AI and machine learning automate complex computations, while platforms like McGraw-Hill Connect provide interactive learning experiences. Real-time data processing and cloud-based solutions further streamline statistical workflows, making it easier to transform raw data into actionable insights and communicate them effectively to stakeholders.

Ethical Considerations in Business Statistics

Ethical practices in business statistics ensure data accuracy, transparency, and fairness. Avoiding misrepresentation and bias is crucial to maintain trust and integrity in statistical communication.

6.1 Avoiding Misrepresentation of Data

Avoiding data misrepresentation is critical in business statistics. This involves ensuring accuracy, transparency, and appropriate context when presenting findings. Misleading visuals or omitting key details can distort interpretations, leading to flawed decisions. Ethical practices require clear communication of data sources, limitations, and methodologies to maintain trust and integrity in statistical analysis and reporting.

6.2 Ensuring Transparency in Statistical Reporting

Transparency in statistical reporting is essential for building trust and credibility. It involves clearly documenting data sources, methodologies, and assumptions. Openly sharing raw data and analyses ensures reproducibility and accountability. Ethical reporting requires avoiding cherry-picked data and honestly disclosing limitations. By maintaining transparency, organizations foster informed decision-making and uphold integrity in their statistical communications.

Visual Tools for Communicating with Numbers

Visual tools like charts and graphs simplify complex data, enhancing clarity and engagement in business communications and key decision-making processes for stakeholders effectively.

7.1 The Power of Charts and Graphs in Data Presentation

Charts and graphs are essential for presenting data clearly and concisely. They transform complex information into visually appealing formats, making it easier for stakeholders to understand key insights quickly. By using tools like bar charts, line graphs, and pie charts, businesses can highlight trends, comparisons, and patterns effectively. This visual approach enhances decision-making and communication, ensuring data-driven strategies are implemented efficiently and effectively.

7.2 Best Practices for Creating Clear and Concise Visuals

When creating visuals, prioritize clarity and purpose. Choose the right chart type to convey your message effectively. Use colors and labels sparingly to avoid overwhelming the audience. Ensure visuals are high-resolution and legible. Keep designs simple, focusing on key data points. Avoid 3D effects or unnecessary embellishments. Use consistent scales and axes for comparisons. Make sure visuals are accessible and understandable to all stakeholders, regardless of their statistical expertise. Accuracy and simplicity are key to effective communication.

Software and Resources for Business Statistics

McGraw-Hill Connect offers digital tools and resources for business statistics. Access eTextbooks and supplements with ISBNs 9781264218882 and 1264218885, enhancing learning and analysis capabilities effectively.

8.1 Overview of McGraw-Hill Connect and Other Tools

McGraw-Hill Connect provides an integrated digital platform for business statistics, offering adaptive learning, interactive simulations, and real-time data analysis. It supports textbooks like Business Statistics: Communicating with Numbers with access codes for online resources. Additional tools include eTextbooks, PDF versions, and VitalSource, enabling flexible access to course materials. These resources aim to enhance learning and application of statistical concepts effectively.

8.2 Accessing Digital and eTextbook Versions

Digital and eTextbook versions of Business Statistics: Communicating with Numbers are available via platforms like VitalSource and McGraw-Hill Connect. Students can purchase access codes for eTextbooks or rent digital copies, offering flexibility and convenience. These formats provide interactive features, search functionality, and offline access, enhancing the learning experience for students studying business statistics and analytics.

Understanding Common Statistical Pitfalls

Recognizing pitfalls like sampling errors and data misinterpretation is crucial. This section helps identify biases and errors, ensuring reliable and accurate statistical analysis in business contexts.

9.1 Recognizing and Avoiding Sampling Errors

Sampling errors occur when a sample does not accurately represent the population, leading to misleading conclusions. Common issues include convenience sampling and voluntary response biases. To avoid these, use random sampling methods and ensure sample diversity. Awareness of these pitfalls helps maintain data integrity and reliability in business statistics, ensuring accurate decision-making processes. Practical strategies are essential for minimizing errors and improving outcomes.

9.2 Interpreting Data Without Bias

Interpreting data objectively requires recognizing and managing biases that can skew conclusions. This involves understanding sample limitations, avoiding assumptions, and presenting findings impartially. By focusing on data-driven insights rather than preconceived notions, analysts ensure credibility. Techniques like peer review and transparent reporting further mitigate bias, fostering trust in statistical conclusions and supporting informed business decisions effectively.

Best Practices for Effective Communication

Clarity, audience focus, and simplicity are key. Use visuals, avoid jargon, and ensure data relevance. These practices enhance the effectiveness of statistical communication in business contexts.

10.1 Tailoring Your Message to Your Audience

Tailoring your message involves understanding your audience’s needs and preferences. Use language and visual aids that resonate with their level of expertise. Highlight key insights relevant to their interests. Avoid technical jargon when communicating to non-experts. For stakeholders, emphasize actionable recommendations. This approach ensures your statistical findings are impactful and drive informed decisions, making your communication more effective and engaging for diverse groups.

10.2 Building Skills to Communicate Effectively with Numbers

Developing the ability to communicate with numbers requires storytelling and clarity. Practice simplifying complex data into clear, actionable insights. Use visualization tools to highlight trends and patterns. Regularly engage in presenting data to diverse audiences to refine your delivery. Incorporate feedback to improve articulation and ensure your message resonates. This skillset is essential for translating statistics into meaningful decisions in business environments.

Business statistics empowers decision-making by transforming raw data into actionable insights. This guide provides a comprehensive toolkit for effective communication, enabling professionals to influence stakeholders and drive success.

11.1 Recap of Key Concepts

Business statistics bridges data and decision-making by transforming raw numbers into actionable insights. Effective communication strategies, such as using charts and graphs, ensure clarity. Ethical considerations, like avoiding data misrepresentation, are crucial. Practical applications highlight the power of statistics in influencing stakeholders. This guide emphasizes transparency and the responsible use of statistical tools, empowering professionals to apply these concepts in real-world scenarios with confidence and integrity.

11.2 Encouragement to Apply Statistical Knowledge in Real-World Scenarios

Applying statistical knowledge in real-world scenarios empowers professionals to make data-driven decisions, solve complex problems, and drive business success. By leveraging tools like charts and graphs, individuals can effectively communicate insights, influencing stakeholders and fostering innovation. Continuous learning and ethical practices ensure sustainable growth, encouraging professionals to embrace statistics as a cornerstone of informed decision-making in today’s fast-paced business environment.

concord 4 user guide

The Concord 4 Security System offers a comprehensive security solution, designed for modern homes and businesses․ Its intuitive interface and advanced features ensure reliable protection, providing peace of mind․ With customizable settings and real-time alerts, it adapts to your needs, ensuring safety and convenience․ This guide will help you navigate its components and operations effectively․

Overview of the Concord 4 Series

The Concord 4 Series is a cutting-edge security system designed for flexibility and reliability․ It features advanced components like touchpads, door/window sensors, and motion detectors, ensuring comprehensive protection․ The system supports up to 230 user codes, allowing personalized access control․ Its intuitive interface and customizable settings make it adaptable to various security needs․ This guide provides detailed insights into its operation, helping users maximize its capabilities for enhanced safety and convenience․

Importance of the User Guide

This user guide is essential for understanding and optimizing your Concord 4 Security System․ It provides step-by-step instructions for arming, disarming, and troubleshooting, ensuring you get the most out of your system․ The guide also includes worksheets for programming and maintaining user codes, helping you manage access securely․ By following the manual, you can customize settings, address common issues, and ensure your system operates efficiently, safeguarding your property and loved ones effectively․

Understanding Your System Components

Your Concord 4 Security System includes a panel, touchpads, door/window sensors, motion sensors, and environmental sensors․ These components work together to provide comprehensive security coverage․

Panel

The panel is the central control unit of your Concord 4 Security System․ It handles arming and disarming, system status monitoring, and configuration․ The panel uses LEDs and beeps to indicate system status, such as armed, disarmed, or alarm conditions․ In case of issues, it provides diagnostic beeps and display messages to help troubleshoot problems․ Familiarizing yourself with these indicators ensures effective system management and quick response to alerts․

Touchpads

Touchpads are essential interfaces for interacting with your Concord 4 Security System․ They allow you to arm/disarm the system, check status, and program settings․ Available in alphanumeric and fixed display models, touchpads provide clear feedback through LCD screens and LED indicators․ The wireless keychain touchpad offers added convenience for remote system control․ Regularly checking touchpad connections ensures reliable operation and quick response to system commands․

Door/Window Sensors

Door/Window Sensors are crucial components of the Concord 4 Security System, providing real-time monitoring of entry points․ These sensors detect openings and trigger alarms when unauthorized access is detected․ They ensure perimeter security and can be integrated with other system components for comprehensive protection․ Proper installation and regular testing are essential to maintain their effectiveness and reliability, ensuring your space remains secure at all times․

Motion Sensors

Motion sensors detect unauthorized movement within protected areas, enhancing security by triggering alarms․ They are designed to minimize false alarms and adapt to environments with pets by using pet lenses․ These sensors integrate seamlessly with the Concord 4 system, ensuring reliable detection and prompt alerts for intruders․ Regular testing is recommended to maintain accuracy and ensure optimal performance, providing peace of mind with their robust security capabilities․

Environmental Sensors

Environmental sensors monitor specific conditions, such as smoke, carbon monoxide, or water leaks, ensuring early detection of potential threats․ These sensors integrate seamlessly with the Concord 4 system, triggering alarms and alerts to notify you of hazards․ They enhance safety by providing real-time monitoring and can be programmed to alert authorities in emergency situations, offering comprehensive protection for your home or business․ Regular testing is essential to maintain their reliability and effectiveness․

Optional System Components

Optional components enhance the Concord 4 system’s functionality, such as wireless keychain touchpads for convenient arming/disarming and remote access devices for system control via smartphones․ Additional sensors, like glass break detectors, can be integrated to expand protection․ These components allow customization to meet specific security needs, ensuring a tailored solution for your home or business․ They integrate seamlessly with the base system, maintaining reliability and ease of use․

Arming and Disarming the System

The Concord 4 system offers flexible arming modes, including Home and Away options․ Enter your user code to arm or disarm, with LED confirmation and beeps indicating status․ Disarming cancels alarms and stops sirens, ensuring secure and efficient operation tailored to your security needs․

Arming in Home Mode

To arm your Concord 4 system in Home Mode, enter your user code at the touchpad․ The system confirms arming with LED lights and three beeps․ Home Mode arms perimeter sensors while allowing free movement inside․ Doors and windows are monitored, and any unauthorized entry triggers an alarm․ The system provides a secure environment while you are home, with optional chime mode for doorbell-like alerts when doors open or close․

Arming in Away Mode

To arm the Concord 4 system in Away Mode, enter your user code at the touchpad, then press the “Away” button․ The system will confirm arming with LED lights and three beeps․ Away Mode activates all sensors, including motion detectors and door/window sensors, ensuring full protection when no one is home․ The system allows a short exit delay for you to leave the premises before fully arming․ Once armed, any unauthorized activity triggers an alarm, providing maximum security․

Disarming the System

To disarm the Concord 4 system, enter your valid user code at the touchpad, followed by pressing the “Off” or “Disarm” button․ The system will confirm disarming with a series of beeps and LED lights turning off․ Disarming stops all alarms, silences sirens, and allows you to re-enter the premises without triggering sensors․ Ensure you have your code ready to avoid delays and restore system access quickly and securely․

Bypassing Protected Areas

To bypass protected areas, arm the system first, then press the “Bypass” button on the touchpad and enter your security code․ The display will show “BYPASS SENSOR _ _” or “ENTER SENSOR NUMBER․” Select the specific zone or sensor you wish to bypass․ This feature is useful when you need to temporarily disable protection for certain areas without disarming the entire system․ Once done, the system will update and bypass the selected zones, ensuring uninterrupted security for the rest of the premises․

Troubleshooting Common Issues

Identify and resolve common system issues, such as beeps or low battery alerts, by checking the cause and addressing it promptly to ensure optimal system performance․

Resolving Alarm Conditions

To resolve an alarm, first identify the cause by checking the touchpad display, which shows the triggered zone․ Silence the alarm by entering your user code․ For smoke detector-related alarms, press 1 followed by your code to reset hardwired detectors․ Clear the alarm memory by following the system prompts․ If issues persist, refer to the troubleshooting section or contact your security provider for assistance․

Clearing Alarm Memory

To clear alarm memory on your Concord 4 system, press 1 followed by your user code․ This action resets the system and removes any recorded alarm events․ Ensure all sensors are secure and no issues persist before clearing․ If alarms recur, check the affected zones or consult the troubleshooting guide for further assistance․ Regularly clearing alarm memory helps maintain accurate system records and ensures proper functionality․

Addressing System Beeps

System beeps indicate issues like low battery, AC power loss, or zone troubles․ To stop beeping, press the * or # button․ However, beeps will resume until the underlying cause is resolved․ Check sensors, ensure proper power supply, and verify all zones are secure․ Refer to the troubleshooting section for specific solutions․ Addressing the root cause ensures continuous system reliability and prevents false alarms․

Maintaining and Updating Your System

Regular maintenance ensures optimal performance․ Update software for enhanced features and security patches․ Manage user codes and reset the system as needed to maintain reliability and functionality․

Regular System Maintenance

Regular system maintenance ensures optimal performance and reliability․ Check all components, including sensors and wires, for damage or wear․ Clean sensors to avoid false alarms and verify proper installation․ Test the system monthly to ensure all features function correctly․ Replace batteries in wireless devices as needed and check the panel’s power supply for stability․ Schedule professional inspections annually for comprehensive system evaluation and adjustments․

Updating System Software

Regular software updates ensure your Concord 4 system remains secure and functions optimally․ Check for updates through the installer menu or by contacting your dealer․ Follow on-screen instructions to download and install new versions․ Updates may enhance features, fix issues, or improve compatibility․ Always verify the source of updates to prevent unauthorized access․ Keep your system up-to-date to maintain peak performance and protect against potential vulnerabilities․

Managing User Access Codes

Your Concord 4 system supports up to 229 individual user codes, ensuring secure access control․ Codes can be added or deleted to manage user permissions․ Use the touchpad or installer menu to modify codes, ensuring only authorized users can arm or disarm the system․ Keep a record of all codes in a safe location for easy reference․ Regularly update codes to maintain security, especially when users are added or removed․

Resetting the System

Resetting the Concord 4 system restores it to factory defaults, clearing all user codes and settings․ To reset, access the installer menu using the touchpad, enter the master code, and press the appropriate keys to initiate the reset․ This process erases all customized settings, so ensure you have backups before proceeding․ Consult the user manual for detailed steps, as improper resetting may require reinstallation of the system․

dikang thermometer instructions

The Dikang Thermometer is a non-contact infrared device designed for quick and accurate body temperature measurement․ It offers ease of use, suitability for all family members, and versatile functionality for various situations․

Overview of the Dikang Thermometer

The Dikang Thermometer is a high-quality, non-contact infrared device designed for quick and accurate body temperature measurement․ It features a sleek, user-friendly design with a digital display and color-coded indicators for easy interpretation․ Suitable for all family members, this thermometer is ideal for home use, offering precise readings in seconds․ It operates on battery power and includes features like fever detection and memory storage․ The device is lightweight, portable, and comes with a comprehensive user manual for easy setup and operation․ Its versatility allows it to be used not only for body temperature but also for measuring water temperature in baths․ Built with durability, the Dikang Thermometer is a reliable choice for everyday health monitoring․

Importance of Following the Instructions

Adhering to the Dikang Thermometer instructions ensures accuracy and safety in measurements․ Proper setup, calibration, and usage techniques are crucial for reliable results․ Misuse can lead to incorrect readings, potentially causing health concerns․ The manual provides guidelines to optimize performance, such as ambient temperature range and avoiding electric shocks․ Following instructions also extends the device’s lifespan and maintains its precision․ Calibration before first use is vital for ensuring measurements align with medical standards․ Ignoring these steps may result in faulty readings or damage to the thermometer․ By following the instructions, users can trust the device for consistent and reliable health monitoring, making it an essential tool for family care․

Setting Up the Dikang Thermometer

Start by unpacking the device and ensuring all contents are included․ Install the batteries correctly, then calibrate the thermometer for accurate readings before first use․

Unpacking and Contents

Upon opening the Dikang Thermometer package, you will find the main infrared thermometer device, a detailed user manual, and a storage box for safekeeping․ Some models may include a set of batteries, while others require you to purchase them separately․ Ensure all components are accounted for before proceeding․ The device is lightweight, typically weighing around 90 grams, and features a sleek, ergonomic design for comfortable handling․ The package may also include additional accessories, such as a quick-start guide or warranty information․ Always refer to the manual for specific instructions on unpacking and preparing your thermometer for use․

Installing Batteries

To power your Dikang Thermometer, insert 2 AAA batteries into the battery compartment located at the back of the device․ Open the compartment by sliding it downward or unscrewing it, depending on the model․ Ensure the batteries are placed correctly, aligning the positive and negative terminals as indicated․ Once installed, close the compartment securely․ The device will automatically turn on, allowing you to proceed with calibration and measurement․ If your model requires activation, press and hold the SET button until the display lights up․ Proper battery installation is essential for accurate temperature readings and optimal performance of your Dikang Thermometer․

Calibration Before First Use

Calibration is essential to ensure accurate temperature readings with your Dikang Thermometer․ Before first use, place the device in a stable environment (10-40°C) for 30 minutes․ Open the battery compartment and locate the calibration button․ Press and hold it until the display shows a zero or calibration symbol․ Release the button and wait for the device to complete the process․ A beep or light indicator will signal successful calibration․ If the process fails, repeat the steps or refer to the user manual for specific instructions․ Proper calibration ensures precise measurements and reliable performance for all future use․

Operating the Thermometer

The Dikang Thermometer features a user-friendly design for quick and efficient temperature measurement․ Simply point the probe at the forehead, press the measure button, and receive accurate results instantly․

Basic Measurement Procedure

Position the probe vertically in the center of the forehead, 3-5 cm away․ Press and hold the measure button until it beeps․ The temperature will display on the screen within 1 second․ Ensure the forehead is dry and free of obstructions for accurate readings․ The device emits a beep to indicate measurement completion․ The color-coded indicators provide quick feedback: green for normal temperature, yellow for mild fever, and red for high fever․ The thermometer automatically shuts off after 10 seconds of inactivity to conserve battery life․ This simple process ensures quick, hygienic, and precise temperature measurement for adults and children alike․

Understanding the Color-Coded Indicators

The Dikang Thermometer features color-coded indicators for easy interpretation of results․ A green light indicates a normal temperature, while yellow signals a mild fever․ A red light alerts you to a high fever․ These visual cues provide instant feedback, making it simple to assess health status quickly․ The color system is designed to be intuitive, ensuring users can react appropriately without confusion․ This feature is particularly useful for parents monitoring their children or for self-assessment․ The indicators are bright and clear, even in low-light conditions, ensuring readability․ Refer to the user manual for specific temperature ranges associated with each color code to ensure accurate interpretation of results․ This system enhances user experience and provides peace of mind․

Changing Measurement Units (Celsius to Fahrenheit)

To switch between Celsius and Fahrenheit on your Dikang Thermometer, follow these simple steps․ First, ensure the device is turned on by pressing the trigger․ Next, locate the SET button and hold it down until the display shows the desired unit․ The thermometer will automatically switch between °C and °F․ Once the unit has changed, release the button to confirm․ This feature allows for flexible use, catering to users familiar with either temperature scale․ The process is quick and intuitive, ensuring seamless operation․ Note that the device will revert to its previous state if no further adjustments are made within a few seconds․ This functionality enhances the thermometer’s versatility for global use․ Always refer to the manual for precise instructions to avoid errors․ The unit change feature is designed for convenience and accuracy, making it a practical tool for everyday use․

Maintenance and Care

Regularly clean the thermometer with a soft cloth and avoid harsh chemicals․ Store it in a dry place, away from direct sunlight, to ensure longevity and accuracy․ Always ensure the batteries are secure to maintain proper function․ Proper care extends the device’s lifespan and ensures reliable measurements․ Follow these steps to keep your Dikang Thermometer in optimal condition․ Regular maintenance is key to consistent performance․ Clean the device gently after each use and store it in a protective case when not in use․ This prevents damage and maintains accuracy․ Always handle the thermometer with care to avoid any physical damage․ Proper storage and cleaning are essential for maintaining its effectiveness․ By following these guidelines, you can ensure your Dikang Thermometer remains a reliable tool for temperature measurement․

Cleaning the Thermometer

To maintain accuracy and hygiene, clean the Dikang Thermometer regularly․ Use a soft, dry cloth to gently wipe the lens and exterior․ Avoid harsh chemicals or abrasive materials, as they may damage the device․ For stubborn stains, dampen the cloth slightly with water, but ensure the thermometer is completely dry before use․ Never submerge the device in water or expose it to excessive moisture․ Cleaning helps prevent bacterial growth and ensures precise measurements․ Regular maintenance also prolongs the lifespan of the thermometer․ Always store the device in a dry, protective case when not in use to avoid dust or damage․ Proper cleaning and care are essential for optimal performance․

Storing the Thermometer Properly

Proper storage of the Dikang Thermometer is essential to maintain its accuracy and longevity․ Store the device in a cool, dry place, away from direct sunlight and moisture․ Use the original packaging or a protective case to prevent scratches or damage․ Avoid exposing the thermometer to extreme temperatures, as this may affect its performance․ Ensure the device is turned off before storing to conserve battery life․ Keep it out of reach of children to prevent accidental damage․ Regularly inspect the thermometer for dust or debris before and after storage․ Proper storage ensures the device remains in optimal condition for future use․

Replacing Batteries

To replace the batteries in your Dikang Thermometer, first ensure the device is turned off․ Open the battery compartment, usually located at the back or bottom of the device․ Gently remove the old batteries and insert two new AAA batteries, ensuring the polarity matches the diagram inside the compartment․ Close the compartment securely․ Turn on the thermometer to verify it is functioning properly․ Avoid mixing old and new batteries or using rechargeable ones unless specified․ Replace batteries when the display dims or measurements become inconsistent․ Proper battery replacement ensures accurate temperature readings and extends the lifespan of your thermometer․

Advanced Features

The Dikang Thermometer offers advanced features like multiple measurement modes, a fever alarm, and customizable settings for enhanced functionality and user experience, ensuring precise and convenient temperature monitoring․

Multiple Measurement Modes

The Dikang Thermometer features multiple measurement modes, including body temperature, object temperature, and ambient temperature detection․ These modes allow users to measure forehead temperature, objects like bath water, or room temperature․ Switching between modes is simple, ensuring versatility for various household needs․ The device is designed for accuracy and convenience, making it ideal for families․ Its ability to adapt to different measurement scenarios enhances its practicality․ Users can easily toggle between settings, ensuring precise readings in any situation․ This feature-rich design makes the Dikang Thermometer a reliable and efficient tool for everyday use, catering to diverse requirements with ease and precision․

Fever Alarm Function

The Dikang Thermometer includes a fever alarm function, which provides visual and audible alerts for elevated temperatures․ The device features color-coded indicators: green for normal temperature, yellow for mild fever, and red for high fever․ Additionally, it emits a beeping sound to signal abnormal readings, ensuring quick identification of potential health issues․ This feature is particularly useful for parents monitoring their children or for individuals needing immediate feedback․ The fever alarm enhances the device’s usability, making it a reliable tool for early detection and timely medical intervention․ Its intuitive design ensures that users can respond promptly to fever alerts, promoting better health outcomes․

Troubleshooting Common Issues

Common issues include inaccurate readings, device shutdown, or battery problems․ Ensure proper calibration, check battery levels, and avoid exposure to extreme temperatures for optimal performance․

Common Errors and Solutions

Common errors with the Dikang Thermometer include inaccurate readings, device shutdown, or low battery warnings․ To resolve these, ensure the thermometer is calibrated correctly, batteries are fresh, and avoid exposure to extreme temperatures․ If the display is blurry, clean the lens with a soft cloth․ For inconsistent readings, check if the probe is positioned correctly on the forehead․ Resetting the device by removing batteries for 10 seconds often resolves operational issues․ Always refer to the user manual for detailed troubleshooting steps to ensure accurate measurements and optimal performance․ Proper maintenance and regular checks can prevent most common problems․

Resetting the Thermometer

To reset the Dikang Thermometer, remove the batteries and press the measurement button for 10 seconds to discharge any residual power․ Reinstall the batteries and turn it on․ This process restores factory settings, resolving issues like inaccurate readings or malfunction․ After resetting, calibrate the device before use to ensure accuracy․ Regular resets can help maintain performance, especially if the thermometer has been exposed to extreme conditions or dropped․ Always follow the manual for proper resetting techniques to avoid permanent damage․ This step is essential for troubleshooting and ensuring reliable temperature measurements․ Resetting is a simple yet effective way to revive your thermometer’s functionality․

The Dikang Thermometer is a reliable and versatile tool for precise temperature measurement․ It comes with a user manual, ensuring easy operation for the whole family․ Accessories include a storage box and batteries for optimal functionality․

Final Tips for Optimal Use

For optimal use of your Dikang Thermometer, ensure proper calibration before first use and maintain a consistent measurement distance of 1-3 cm from the forehead․ Avoid direct sunlight or drafts, as these can affect accuracy․ Clean the lens regularly with a soft cloth to prevent dust buildup․ Store the thermometer in a cool, dry place, away from children․ Replace batteries promptly when low to maintain performance․ Utilize the fever alarm feature for quick alerts and switch between measurement modes as needed․ Always refer to the user manual for advanced settings and troubleshooting․ Proper care ensures long-term reliability and precise readings․

Additional Accessories and Resources

Your Dikang Thermometer comes with essential accessories, including a user manual and protective storage box․ For enhanced functionality, consider purchasing a screen protector to prevent lens scratches․ Replacement AAA batteries are recommended for consistent performance․ The manual provides detailed instructions, but additional resources like online tutorials and customer support are available․ Visit the official website for updated software or troubleshooting guides․ Optional accessories may include a carrying pouch for portability․ Ensure all replacements and extras are compatible with your model to maintain warranty and performance․ These resources and accessories enhance your experience, ensuring accurate and convenient temperature measurement for years to come․

5th grade morning work pdf free

5th Grade Morning Work PDF Free offers a collection of engaging activities designed to help students start their day with purposeful academic practice and skill review․

1․1 What is Morning Work in 5th Grade?

Morning work in 5th grade refers to short, engaging activities students complete at the start of the school day․ These tasks are designed to review previous skills, introduce new concepts, and transition students into a focused mindset․ They often include reading comprehension, math problems, language exercises, and critical thinking prompts․ Morning work helps establish a routine, reinforces learning, and prepares students for the day ahead․ It is typically structured to be independent and self-paced, fostering accountability and a strong work ethic․ The activities are aligned with grade-level standards and are adaptable to different learning styles․ By incorporating thematic elements, such as seasons or holidays, morning work can also add variety and interest to the daily routine․ This approach ensures students begin their day productively and are ready to engage with more complex lessons․

1․2 Importance of Morning Work for 5th Graders

Morning work is crucial for 5th graders as it establishes a consistent daily routine, fostering responsibility and time management․ It helps transition students from home to school mode, ensuring they are mentally prepared for the day․ These activities reinforce previously learned skills, preventing knowledge gaps and promoting retention․ Additionally, morning work introduces new concepts gradually, easing students into more complex lessons․ It also enhances focus and organizational skills, setting a positive tone for academic success․ By incorporating varied tasks, morning work keeps students engaged and motivated, encouraging a love for learning․ It provides immediate feedback for teachers, allowing them to address areas where students may need extra support․ Overall, morning work plays a vital role in both academic growth and personal development, helping students build confidence and independence․

Benefits of Using 5th Grade Morning Work PDF Free

5th Grade Morning Work PDF Free provides a structured start to the day, offering a mix of ELA and math activities․ It promotes skill retention and introduces new concepts through engaging tasks, keeping students focused and prepared for lessons․ Seasonal themes and interactive options make learning fun and relevant, ensuring a smooth transition into the school day while supporting academic growth and classroom engagement;

2․1 Academic Benefits

5th Grade Morning Work PDF Free enhances learning by providing consistent practice in ELA and math․ It spirals through essential skills, reinforcing previous lessons while introducing new concepts․ Seasonal themes keep activities engaging, ensuring students stay motivated․ The structured format helps build strong foundational knowledge, improving reading comprehension, grammar, and math problem-solving abilities․ Regular practice fosters academic confidence and prepares students for standardized tests․ Additionally, the integration of science and social studies promotes cross-curricular connections, enriching overall understanding and critical thinking skills․

2․2 Classroom Management Benefits

5th Grade Morning Work PDF Free aids in establishing a structured start to the day, fostering a productive classroom environment․ It provides a consistent routine, ensuring students transition smoothly into learning mode․ The activities minimize disruptions, allowing teachers to handle attendance and administrative tasks efficiently․ Morning work also encourages independent practice, reducing reliance on teacher supervision and promoting self-discipline․ This structured approach helps students develop time management skills and a sense of responsibility, creating a focused and orderly classroom atmosphere․

5th Grade ELA Morning Work

5th Grade ELA Morning Work PDF Free provides engaging activities focused on reading comprehension, grammar, and language skills, with thematic exercises to enhance literacy proficiency in students․

3․1 Reading Comprehension Activities

Reading comprehension activities in 5th Grade Morning Work PDF Free include passages with questions, fostering critical thinking and vocabulary expansion․ Thematic texts aligned with seasonal events and holidays engage students, making learning fun and relevant․ These exercises help students develop fluency and understanding, preparing them for more complex literature․ Interactive elements like multiple-choice questions and open-ended responses cater to diverse learning styles, ensuring comprehensive skill development․ Regular practice strengthens their ability to analyze and interpret texts effectively․

3․2 Language and Grammar Exercises

Language and grammar exercises in 5th Grade Morning Work PDF Free focus on refining writing and communication skills․ Activities include identifying parts of speech, correcting sentence structure, and practicing proper punctuation․ Students engage in editing tasks, vocabulary building, and sentence completion to enhance their command of language․ Thematic exercises aligned with seasons or holidays make learning engaging․ Interactive elements like crossword puzzles and word searches add variety, ensuring students master grammar fundamentals while staying motivated and prepared for more complex tasks ahead․ Regular practice builds confidence in their ability to express ideas clearly and effectively․

5th Grade Math Morning Work

5th Grade Math Morning Work PDF Free provides daily math exercises to reinforce essential skills, including word problems, fractions, and logic games, ensuring a strong foundation in math concepts․

4․1 Word Problems and Fractions

Word problems and fractions are key components of 5th grade math morning work, helping students develop problem-solving skills and critical thinking․ These exercises often involve real-world scenarios, making math relatable․ Fractions are introduced with visual aids and practical examples to ensure clarity․ The free PDF resources include a mix of word problems, fraction operations, and application-based questions․ They are designed to prepare students for more complex math concepts later in their academic journey․ Interactive and digital options, such as Google Slides, also provide engaging ways to practice these skills․ Answer keys are included for easy grading and self-assessment․

4․2 Math Puzzles and Logic Games

Math puzzles and logic games in 5th grade morning work PDFs enhance problem-solving skills and critical thinking․ Activities like Sudoku, KenKen, and logic grids engage students creatively․ These exercises encourage mental math, pattern recognition, and strategic planning․ Logic games often involve sequences, shapes, and riddles, making learning fun and interactive․ Free resources include printable puzzles and digital versions for Google Classroom, ensuring variety and accessibility for all learners․ These tools foster a love for math while reinforcing key concepts in an enjoyable way․

Additional Subjects in 5th Grade Morning Work

Morning work for 5th graders often includes science, social studies, and health topics, promoting interdisciplinary learning and reinforcing foundational knowledge in diverse academic areas effectively․

5․1 Science and Social Studies Integration

Morning work often incorporates science and social studies through engaging activities such as short readings, puzzles, and factual questions․ These exercises align with curriculum standards, reinforcing key concepts in history, geography, and STEM․ Interactive worksheets encourage critical thinking and problem-solving skills, while thematic content ties learning to holidays, seasons, or cultural events․ This integration fosters a well-rounded education and prepares students to connect ideas across subjects․ It also supports interdisciplinary learning, making academic exploration fun and meaningful․

5․2 Health and Nutrition Worksheets

Health and nutrition worksheets in 5th grade morning work focus on teaching students about healthy eating habits and wellness․ These activities include matching games, word searches, and short comprehension exercises․ Students learn about food groups, meal planning, and the importance of balanced diets․ Interactive tasks encourage critical thinking and practical application of healthy choices․ Digital formats, like Google Slides, make these lessons engaging and accessible for modern learners․ These resources are designed to promote lifelong healthy habits in a fun and educational way․

Free Resources for 5th Grade Morning Work

Explore free downloadable PDFs and printable worksheets tailored for 5th-grade morning routines, covering ELA, math, and additional subjects to kickstart learning effectively every day․

6․1 Websites Offering Free PDF Downloads

Websites like Teachers Pay Teachers and Education․com provide an array of free PDF downloads for 5th-grade morning work․ These resources include interactive activities, themed worksheets, and comprehensive packets covering ELA, math, and additional subjects․ Many offerings are curriculum-aligned and designed to engage students with skill-building exercises․ Teachers can easily download and print these materials to create a structured morning routine that fosters learning and readiness for the day ahead․

6․2 Printable Worksheets and Activities

Printable worksheets and activities for 5th-grade morning work offer a diverse range of engaging exercises․ From ELA and math to science and social studies, these resources provide structured practice․ Many are themed around seasons, holidays, or special events, making learning fun and relevant․ They include skill reviews, puzzles, and logic games to keep students engaged; Teachers can print these activities to create a consistent morning routine that fosters academic readiness and sets a positive tone for the day․

Interactive and Digital Morning Work Options

Digital tools like Google Slides and online bell ringers offer interactive alternatives to traditional paper-based morning work, enhancing engagement and catering to tech-savvy learners effectively․

7․1 Google Slides for Google Classroom

Google Slides offers interactive and engaging morning work activities tailored for 5th graders, easily accessible within Google Classroom․ These digital slides provide a variety of exercises, including reading comprehension, math problems, and word games, all structured to align with academic standards․ Teachers can assign these slides seamlessly, allowing students to complete tasks independently․ The slides are often themed around seasons or holidays, making learning fun and relevant․ This format also simplifies grading and tracking student progress efficiently․

7․2 Digital Bell Ringers and Do-Now Activities

Digital Bell Ringers and Do-Now Activities are quick, engaging tasks designed to get students focused and ready to learn as soon as they arrive․ These activities often include math warm-ups, reading prompts, or short writing exercises․ They are created to be completed within minutes, helping students transition smoothly into the school day․ Many resources offer customizable templates, allowing teachers to tailor activities to specific learning needs․ These digital tools also support classroom management by minimizing downtime and encouraging immediate engagement, fostering a productive start to the day․ Teachers can easily share these activities via Google Classroom or similar platforms, making them accessible and convenient for students․ By integrating seasonal or holiday themes, these activities can align with current classroom events, adding relevance and fun․ Overall, digital bell ringers are a modern, efficient way to kickstart learning and set a positive tone for the day․

Year-Long Comprehensive Morning Work Curriculum

A year-long curriculum ensures consistent skill review and introduces new concepts, keeping students engaged with thematic structures and spiral learning to build academic confidence throughout the year․

8․1 Thematic Structure Based on Seasons and Holidays

The curriculum incorporates seasonal and holiday themes, making learning fun and relevant․ Each month’s activities align with events like Halloween or Christmas, ensuring engagement while covering ELA and math standards․ This approach fosters a connection between academics and real-world experiences, enhancing motivation and making mornings enjoyable and educational for 5th graders․ The thematic structure also allows for creative integration of various subjects, promoting a well-rounded learning experience․

8․2 Spiral Review of Skills and Standards

The curriculum features a spiral review approach, reinforcing previously learned skills while introducing new ones․ Each activity builds on prior knowledge, ensuring mastery and retention․ This method supports continuous progress, aligning with grade-level standards; By revisiting concepts regularly, students strengthen their foundation, boosting confidence and preparedness for more complex material․ The spiral structure ensures comprehensive coverage of ELA, math, and other subjects, fostering a deep understanding and seamless transition to higher-level learning․ This approach is both effective and engaging for 5th graders․

Seasonal and Holiday-Themed Morning Work

Engage students with themed activities tied to seasons, holidays, and special events, fostering excitement and relevance while reinforcing academic skills through festive and meaningful exercises․

9․1 Monthly Themes and Activities

Monthly themes in 5th grade morning work PDFs align activities with seasonal events and holidays, keeping content fresh and engaging․ For example, September might feature back-to-school themes, while December includes holiday-themed puzzles and reading passages․ These activities not only reinforce academic skills but also foster a sense of connection to the time of year․ Students enjoy the variety, and teachers appreciate how themes tie into broader classroom celebrations and learning opportunities․

9․2 Event-Based Learning Opportunities

Event-based learning opportunities in 5th grade morning work PDFs connect academic skills to real-world events and holidays, making learning interactive and meaningful․ For instance, activities tied to Earth Day might include reading passages about conservation or math problems involving recycling․ These exercises help students engage with timely topics while reinforcing essential skills․ Such themed activities also encourage curiosity and creativity, making mornings both educational and enjoyable for young learners․

5th Grade Morning Work PDF Free provides a versatile and engaging way to kickstart learning, offering a mix of ELA, math, and thematic activities for young scholars․

10․1 Final Thoughts on 5th Grade Morning Work PDF Free

5th Grade Morning Work PDF Free is an excellent resource for educators seeking to engage students with structured, thematic activities․ These free materials cover ELA, math, and more, ensuring a well-rounded start to the day․ With seasonal themes and spiral skill reviews, they keep learning fresh and relevant․ Whether printed or digital, these resources offer flexibility for diverse classrooms․ Educators can confidently use these materials to support academic growth and foster a love for learning in their students․

10․2 Encouragement to Utilize Free Resources

Utilizing free 5th Grade Morning Work resources is a practical and cost-effective way to enhance classroom engagement and academic preparation․ These materials provide a variety of activities that cater to different learning styles and needs․ By incorporating these resources, educators can save time while offering students meaningful practice․ The flexibility of printable and digital formats ensures accessibility for all classrooms․ Embrace these free tools to create a consistent and impactful morning routine that supports student success and fosters a positive learning environment․

ultrasound guided thyroid biopsy cpt code

Ultrasound-guided thyroid biopsy involves using ultrasound imaging to precisely locate nodules, ensuring accurate tissue sampling. This minimally invasive procedure is essential for diagnosing thyroid abnormalities, with specific CPT codes guiding billing.

1.1 Overview of the Procedure

Ultrasound-guided thyroid biopsy is a minimally invasive procedure where ultrasound imaging directs the needle to thyroid nodules. A physician uses real-time imaging to guide the needle, ensuring precise tissue sampling. This method enhances diagnostic accuracy and minimizes complications. It is a critical tool for evaluating suspicious thyroid nodules, offering both effectiveness and patient comfort.

1.2 Importance of Ultrasound Guidance in Thyroid Biopsy

Ultrasound guidance enhances precision in thyroid biopsy by providing real-time imaging, reducing complications, and improving diagnostic accuracy. It helps locate nodules accurately, especially in difficult-to-reach areas, minimizing blind biopsy risks. This method ensures targeted tissue sampling, reducing patient discomfort and improving safety, making it a critical tool for effective thyroid nodule evaluation and diagnosis.

CPT Coding for Ultrasound-Guided Thyroid Biopsy

Key CPT codes include 10022 for fine-needle aspiration and 76942 for ultrasound guidance. Codes vary based on procedure specifics, ensuring accurate billing for services rendered.

2.1 Primary CPT Codes for the Procedure

The primary CPT codes for ultrasound-guided thyroid biopsy include 10005 for fine-needle aspiration of one nodule and 10006 for multiple nodules. These codes are specific to thyroid procedures. Additionally, 76942 is used for ultrasound guidance during the biopsy. For bilateral procedures, modifiers like -RT (right) and -LT (left) are applied. Always ensure accurate coding to reflect the procedure’s complexity and specifics.

2.2 Additional Codes for Related Services

Beyond primary biopsy codes, additional CPT codes may apply for related services, such as ultrasound imaging (CPT 76536) or image guidance (CPT 77012). Codes for fine-needle aspiration (CPT 10022) and ultrasound guidance (CPT 76942) may also be relevant. Modifiers like 50 (bilateral procedures) or 26 (professional component) should be used when applicable to ensure accurate billing. Always verify payer-specific guidelines for proper code combinations.

2.3 Billing Modifiers and Their Usage

Billing modifiers are essential for accurate coding of ultrasound-guided thyroid biopsy. Modifier 50 is used for bilateral procedures, ensuring proper reimbursement. Modifier 26 is applied when coding for the professional component of imaging guidance. However, CPT code 76942 should not be billed bilaterally, as it is not allowable. Always verify payer guidelines, as some require specific modifiers for correct processing. Proper modifier usage ensures compliance and prevents billing errors.

Billing Guidelines and Compliance

Accurate coding requires adherence to guidelines, ensuring proper use of CPT codes for unilateral or bilateral procedures, with correct documentation and modifiers to avoid billing discrepancies.

3.1 Unilateral vs. Bilateral Procedures

Ultrasound-guided thyroid biopsy coding distinguishes between unilateral and bilateral procedures. For unilateral, CPT codes 10005 or 10006 are used, while bilateral procedures require modifiers like -50 for CPT 76942. However, CPT 76942 cannot be billed bilaterally as it is not allowed by coding guidelines. Proper documentation of laterality is crucial to avoid reimbursement issues and ensure accurate billing. This distinction ensures precise coding for each procedure type.

3.2 Proper Documentation Requirements

Accurate documentation is critical for ultrasound-guided thyroid biopsy billing. Detailed reports must include medical necessity, ultrasound findings, and biopsy results. Proper CPT code assignment requires clear documentation of unilateral or bilateral procedures, with imaging guidance noted. Ensure compliance with payer policies and coding guidelines to avoid denials. Maintain precise records of patient identifiers, dates, and procedure specifics for seamless reimbursement processes and audits.

Clinical Indications for Ultrasound-Guided Thyroid Biopsy

Ultrasound-guided thyroid biopsy is indicated for evaluating suspicious thyroid nodules or abnormalities. It ensures precise tissue sampling for diagnosing malignancy or benign conditions, guided by imaging.

4.1 When a Biopsy is Medically Necessary

A biopsy is medically necessary when thyroid nodules exhibit suspicious features on ultrasound, such as irregular margins, microcalcifications, or increased vascularity. Clinical criteria, including nodule size and patient history, guide decision-making. Symptomatic nodules or those causing compressive symptoms may also require biopsy. Ultrasound guidance ensures precise tissue sampling, optimizing diagnostic accuracy and patient outcomes.

4.2 Role of Ultrasound in Selecting Patients

Ultrasound plays a critical role in selecting patients for thyroid biopsy by evaluating nodule characteristics. It helps identify suspicious features, guiding fine-needle aspiration (FNA) for nodules meeting specific size or echographic criteria. This ensures biopsies are performed only when medically necessary, reducing unnecessary procedures and optimizing diagnostic accuracy. Ultrasound criteria, such as nodule size and vascularity, aid in prioritizing patients for tissue sampling, enhancing patient outcomes and resource allocation.

Procedure Technique and Equipment

Ultrasound-guided thyroid biopsy is a minimally invasive procedure using real-time imaging to direct the needle into the nodule. Equipment includes an ultrasound machine, high-frequency probe, biopsy needle, and syringe for tissue sampling.

5.1 Step-by-Step Process of the Biopsy

The procedure begins with patient preparation and positioning. Ultrasound imaging locates the thyroid nodule. The area is cleaned, and local anesthesia is administered. A biopsy needle is inserted under ultrasound guidance to collect tissue samples. Post-procedure, pressure is applied to minimize bleeding, and the patient is monitored for complications. The process ensures precise tissue collection for accurate diagnosis.

5.2 Ultrasound Imaging and Tissue Sampling

Ultrasound imaging provides real-time visualization, guiding the needle precisely to thyroid nodules. Tissue sampling is performed under direct visualization, ensuring accuracy. This technique minimizes complications and improves diagnostic yield. The process involves inserting a fine needle into the nodule, with ultrasound confirming proper placement. Samples are then analyzed for cytological evaluation, aiding in accurate diagnosis and treatment planning for thyroid abnormalities.

Common Coding Errors and Pitfalls

Common coding errors include incorrect use of modifiers, such as bilaterality, and unbundling procedures. Overcoding and improper documentation can lead to denied claims or audits.

  • Incorrect use of modifiers like -50 for bilateral procedures.
  • Unbundling codes that should be billed together.
  • Overcoding by including unnecessary services.

6.1 Incorrect Use of Modifiers

Incorrect use of modifiers in ultrasound-guided thyroid biopsy coding can lead to denied claims and payment issues. Common errors include inappropriate application of bilateral modifiers or using modifiers for unrelated procedures. Accurate modifier usage ensures proper reimbursement and compliance with coding guidelines. Always verify modifier rules specific to thyroid biopsy procedures to avoid billing errors and ensure adherence to payer policies.

6.2 Unbundling and Overcoding Issues

Unbundling occurs when separate codes are billed for services included in a single procedure. Overcoding involves using higher-level codes than warranted. For ultrasound-guided thyroid biopsies, unbundling might include billing both a biopsy code and an imaging code separately. Overcoding could involve using codes for bilateral procedures when only unilateral was performed. Proper understanding of CPT guidelines and accurate documentation are crucial to avoid these errors and ensure compliant billing practices.

Reimbursement and Payment Considerations

Reimbursement for ultrasound-guided thyroid biopsy depends on insurance coverage and payer policies. Accurate CPT coding and proper documentation ensure correct payment rates and avoid billing disputes.

7.1 Insurance Coverage and Payer Policies

Insurance coverage for ultrasound-guided thyroid biopsy varies by payer policies. Most insurers cover the procedure when medically necessary, such as for suspicious nodules. CPT codes 10022 and 76942 are commonly reimbursed, but preauthorization may be required. Medicare and private payers often align on coverage criteria, emphasizing diagnostic necessity. Documentation of ultrasound guidance is critical for reimbursement, as payers scrutinize claims for accuracy and adherence to coding guidelines.

7.2 Payment Rates and Billing Processes

Payment rates for ultrasound-guided thyroid biopsy vary by payer and policy. CPT codes 10022 and 76942 are typically reimbursed based on insurer fee schedules. Billing requires precise documentation, including modifiers for bilateral procedures. Accurate coding ensures timely payments, while errors may delay or reduce reimbursement. Staying updated on payer-specific billing guidelines is crucial to optimize payment rates and streamline the billing process for healthcare providers.

Recent Updates and Changes in Coding

New CPT codes for thyroid biopsy procedures have been introduced, alongside updates in billing guidelines to enhance accuracy and compliance with coding standards.

8.1 New CPT Codes for Thyroid Procedures

New CPT codes have been introduced to better capture the specifics of ultrasound-guided thyroid biopsies. Codes such as 93880 (complete) and 93882 (unilateral/limited) are now utilized to accurately report these procedures. These updates ensure precise billing for thyroid nodule evaluations, reflecting advancements in imaging and tissue sampling techniques. Staying informed about these codes is crucial for accurate reimbursement and compliance with current guidelines.

8.2 Updates in Billing Guidelines

Recent updates in billing guidelines emphasize accurate reporting of ultrasound-guided thyroid biopsy procedures. Specific CPT codes, such as 76942 for guidance, must be used correctly, avoiding unbundling. Clarifications on bilateral procedures ensure proper coding, with modifiers applied when necessary. Documentation must reflect medical necessity and procedural details to comply with payer policies and avoid billing errors.

Case Studies and Examples

A bilateral thyroid biopsy using CPT codes 10022 (RT) and 10022 (LT) for each nodule, with 76942 for ultrasound guidance, ensures accurate coding and billing practices.

9.1 Correct Coding for a Bilateral Biopsy

For a bilateral ultrasound-guided thyroid biopsy, CPT codes 10005 (right side) and 10006 (left side) are reported. The ultrasound guidance component is billed using CPT code 76942 once, regardless of the number of nodules or sides. Modifier -50 is appended to indicate bilateral procedures when applicable.

Ensure separate coding for each nodule and side, avoiding unbundling. Proper documentation of laterality and ultrasound guidance is essential for accurate reimbursement. Always verify payer-specific guidelines for bilateral coding requirements.

9.2 Coding for Unilateral or Limited Procedures

For unilateral or limited ultrasound-guided thyroid biopsies, CPT code 10005 (right side) or 10006 (left side) is reported. The ultrasound guidance component is billed using CPT code 76942. Modifier -LT or -RT may be appended to indicate laterality, though some payers prefer not to use modifiers for unilateral procedures. Proper documentation of the procedure’s extent and laterality is critical for accurate coding and reimbursement.

Accurate coding and compliance are crucial for ultrasound-guided thyroid biopsy. Avoid common pitfalls like incorrect modifiers and overcoding. Stay updated with new CPT codes and guidelines to ensure proper reimbursement and maintain quality patient care.

10.1 Key Takeaways for Accurate Coding

Accurate coding for ultrasound-guided thyroid biopsy requires understanding specific CPT codes, proper use of modifiers, and adherence to billing guidelines. Ensure correct documentation of unilateral vs. bilateral procedures and avoid unbundling or overcoding. Stay updated on coding changes and payer policies to minimize errors and optimize reimbursement. Proper use of modifiers like -50 for bilateral procedures is crucial. Always verify clinical necessity and documentation to support coding decisions.

10.2 Importance of Staying Updated

Staying updated on CPT code changes and billing guidelines is crucial for accurate coding of ultrasound-guided thyroid biopsy. New codes, such as 93880 and 93882, and revised guidelines ensure compliance and proper reimbursement. Regularly reviewing updates from authoritative sources helps avoid coding errors and ensures adherence to payer policies. This ongoing effort is essential for maintaining accurate billing practices and avoiding revenue loss.

21c bus timetable croyde to barnstaple pdf

The 21C bus service connects Croyde Bay to Barnstaple, operated by Stagecoach South West, offering regular routes for residents and visitors in North Devon․ It provides essential transport links, ensuring convenient travel between key destinations with real-time tracking and accessible stops․

Overview of the 21C Bus Route

The 21C bus route connects Barnstaple to Croyde Bay, serving key stops like Ruda Holiday Park and Georgeham․ Operated by Stagecoach South West, it provides essential transport links across North Devon, ensuring accessible travel for both residents and visitors with a reliable network of stops and schedules;

Importance of the Croyde to Barnstaple Route

The Croyde to Barnstaple route is vital for connecting coastal communities and inland towns, facilitating daily commutes, tourism, and access to essential services․ It supports local businesses and enhances mobility, making it a lifeline for residents and visitors in North Devon․

21C Bus Timetable Details

The 21C bus timetable operates Monday to Friday, with services running from 06:40 AM to 06:42 PM․ Sundays feature a reduced schedule from May 26 to September 15․

Weekday Operating Hours

On weekdays, the 21C bus operates from 06:40 AM to 06:42 PM, with frequent departures throughout the day․ Barnstaple services run from 07:40 AM to 06:40 PM, while Croyde Bay operates from 09:40 AM to 03:40 PM․ Georgeham starts at 06:40 AM, ending at 05:45 PM, and Sticklepath begins at 07:35 AM․

Weekend and Holiday Schedules

The 21C service operates on Sundays from May 26 to September 15, excluding Christmas, Boxing Day, and New Year’s Day․ Weekend schedules are reduced, with buses running between key stops like Barnstaple and Croyde Bay, ensuring connectivity during off-peak times while accommodating seasonal demand and public holidays․

Frequency of Buses Throughout the Day

Buses on the 21C route operate every 30 to 60 minutes from Barnstaple and Croyde Bay on weekdays, with consistent service during peak hours․ Weekend frequencies are reduced but maintain regular intervals, ensuring reliable connections for commuters and visitors across North Devon throughout the day․

Key Stops on the 21C Route

The 21C route includes major stops like Barnstaple Bus Station, Croyde Bay, Braunton, Saunton, and Georgeham, offering convenient access to residential and tourist areas along the way․

Major Stops Between Croyde and Barnstaple

The 21C route features key stops including Barnstaple Bus Station, Braunton, Saunton Sands, Croyde Bridge, and Ruda Holiday Park․ These stops provide easy access to residential areas, beaches, and tourist attractions, with buses running regularly between these points, ensuring a smooth journey from Croyde to Barnstaple in approximately 40 minutes․

Duration of the Journey

The 21C bus journey from Croyde to Barnstaple takes approximately 40 minutes, offering a quick and efficient route․ With regular departures and a direct path, passengers can expect a seamless travel experience, making it ideal for commuters and tourists alike exploring North Devon’s scenic destinations․

Accessibility and Key Landmarks

The 21C route is designed for accessibility, serving key landmarks like Ruda Holiday Park and Croyde Bridge․ It connects to Saunton Sands and Braunton, ensuring convenient access for all passengers․ The service stops near popular destinations, making it ideal for both locals and tourists exploring North Devon’s attractions․

Downloading the 21C Timetable PDF

The 21C timetable PDF is available on StagecoachBus․com, providing a downloadable schedule for planning trips between Croyde and Barnstaple with real-time updates and route details․

Steps to Access the PDF Version

Visit StagecoachBus․com and navigate to the 21C timetable section․ Search for “21C bus timetable” to find the PDF․ Download directly for offline access or view the route map for detailed planning and real-time updates․

Features of the Digital Timetable

The digital 21C timetable offers real-time updates, route maps, and stop details․ Users can track buses live, view arrival times, and plan journeys efficiently․ The PDF format ensures offline access, while the interactive map helps visualize the route from Croyde to Barnstaple, enhancing travel planning and convenience for all passengers․

Benefits of Using the PDF Format

The PDF timetable is portable and accessible offline, allowing users to plan journeys without internet․ It provides clear, printable schedules and easy navigation, making it ideal for quick reference․ The format ensures consistent and reliable information, helping passengers stay informed and on time for their 21C bus travel needs․

Service Reliability and Challenges

The 21C bus service faces reliability challenges, including traffic congestion and roadworks, leading to delays․ Passengers have raised concerns about punctuality and communication during disruptions, impacting overall service consistency․

Common Delays and Their Causes

The 21C bus service often experiences delays due to heavy traffic, particularly during peak hours and seasonal periods․ Roadworks and accidents along the route further contribute to disruptions, while mechanical issues and driver shortages occasionally impact service reliability, causing frustration for passengers relying on the timetable․

Passenger Feedback on Service Quality

Passengers have expressed mixed opinions about the 21C bus service․ While many appreciate the convenient route coverage and affordable fares, others criticize frequent delays and unreliable timetables․ Some highlight friendly drivers and clean vehicles, but overall satisfaction is tempered by the need for improved punctuality and better communication during disruptions․

Efforts to Improve Timeliness

additional evening services and real-time tracking via apps like Moovit to enhance punctuality․ They are also analyzing passenger feedback to adjust schedules and reduce delays, ensuring smoother journeys for commuters and visitors alike․

Connecting Routes and Interchanges

Stagecoach South West has introduced additional evening services and real-time tracking via apps like Moovit to enhance punctuality․ They are also analyzing passenger feedback to adjust schedules and reduce delays, ensuring smoother journeys for commuters and visitors alike․

Interchange Options at Barnstaple Bus Station

Barnstaple Bus Station serves as a central hub, offering seamless connections to multiple routes, including the 21C, 21B, and others․ Passengers can transfer to services heading toward Ilfracombe, Appledore, Westward Ho!, Georgeham, and Braunton․ The station provides clear signage, real-time updates, and convenient access to additional travel options, making it a key interchange point for North Devon travelers․

Integration with Other North Devon Services

The 21C bus service seamlessly connects with other North Devon routes, such as the 21B to Georgeham and Sticklepath, and services to Ilfracombe, Appledore, and Westward Ho!․ This integration ensures passengers can easily transfer between lines, making travel across the region efficient and accessible with coordinated timetables and real-time updates․

Planned Transfers for Longer Journeys

Passengers on the 21C can plan seamless transfers at Barnstaple Bus Station for onward travel to destinations like Ilfracombe or Appledore․ The service is synchronized with other routes, enabling efficient connections and minimizing waiting times for longer trips across North Devon through Stagecoach’s coordinated network․

Ticketing and Fare Options

The 21C service offers single and return tickets, ideal for both occasional and frequent travelers․ Stagecoach South West provides affordable fares with options for payment using cash or contactless methods, ensuring a convenient and hassle-free experience for all passengers․

Single and Return Ticket Availability

Single tickets are valid for one journey, while return tickets offer round-trip convenience․ Both options are available, with cash and contactless payments accepted, ensuring flexibility for all travelers on the 21C route․

Special Fares for Frequent Travelers

Frequent travelers can benefit from Stagecoach’s regular traveler tickets, offering discounted rates for regular commutes․ These passes provide cost-effective solutions for those using the 21C service frequently, ensuring budget-friendly travel for both short and longer journeys in North Devon․

Payment Methods Accepted

Passengers can pay with cash, contactless cards, or mobile payments․ Pre-bought tickets or Stagecoach’s app tickets are also accepted․ Single tickets are valid for one journey, offering flexibility for occasional travelers while frequent users can benefit from multi-journey options for convenience․

Special Services and Events

The 21C service offers additional buses during major events like Oceanfest and seasonal timetable adjustments․ Extra evening services are provided to accommodate event-goers, ensuring reliable transport during peak times and festivals in North Devon․

Additional Buses for Major Events

During major events like Oceanfest, the 21C service deploys extra buses to handle increased passenger demand․ These additional evening services ensure smoother travel for attendees, with extended operational hours and more frequent departures to key stops such as Croyde Bay and Barnstaple, enhancing connectivity during peak periods in North Devon․

Seasonal Adjustments to Timetables

Seasonal changes influence 21C bus schedules, with reduced frequencies during off-peak times and enhanced services during summer months․ Sunday operations run from late May to mid-September, ensuring year-round connectivity between Croyde Bay, Braunton, and Barnstaple, accommodating tourist and local travel patterns effectively throughout the year in North Devon․

Emergency Service Availability

Emergency services on the 21C route operate on Sundays and public holidays, excluding Christmas, Boxing Day, and New Year’s Day․ This ensures minimal disruption and maintains essential connectivity for urgent travel needs between Croyde Bay, Braunton, and Barnstaple, providing reliable service even during reduced schedules, as detailed in the PDF timetable․

Map Integration and Route Visualization

The 21C route is visualized on maps, showing stops from Barnstaple to Croyde Bay via Braunton․ The PDF timetable includes a detailed map for easy navigation and real-time tracking of buses, enhancing journey planning for passengers․

Visual Representation of the Route

The 21C route is clearly mapped, showcasing the journey from Barnstaple to Croyde Bay via Braunton․ Detailed stop locations and key landmarks are highlighted, aiding passengers in understanding the route layout․ Digital tools like the Moovit App and Stagecoach website provide interactive visuals, ensuring easy navigation and real-time tracking of the 21C service․

Tracking Buses in Real-Time

Passengers can track the 21C bus in real-time using the Moovit App or Stagecoach website․ Live updates provide precise arrival times, reducing wait periods․ The service also offers a map view, showing the exact location of buses on the Croyde to Barnstaple route, enhancing journey planning efficiency and reliability for all users․

Geographic Coverage of the 21C Line

The 21C line spans across North Devon, connecting Barnstaple to Croyde Bay via Braunton․ It covers scenic coastal areas and rural villages, ensuring accessible transport for both locals and tourists․ The route includes stops at key landmarks, making it a vital link for communities and visitors exploring the region․

Passenger Feedback and Reviews

Passengers praise the 21C service for its convenient stops and scenic route․ However, some express frustration over delays, impacting reliability․ Stagecoach continues to address feedback to enhance service quality and passenger satisfaction․

Common Complaints and Praise

Passengers frequently praise the 21C service for its scenic route and convenient stops, while some express frustration over delays․ Positive feedback highlights reliable schedules and friendly drivers, though occasional late arrivals remain a concern․ Overall, the service is valued for connecting key North Devon locations efficiently․

Impact of Feedback on Service Changes

Passenger feedback has led to adjustments in the 21C service, including improved punctuality measures and additional evening buses for events like Oceanfest․ Real-time tracking enhancements and clearer timetable updates reflect efforts to address common complaints and enhance overall service quality for commuters and tourists alike․

Overall Satisfaction Ratings

Passengers generally praise the 21C service for its reliability and integration with North Devon’s transport network․ While real-time tracking and route visualization are appreciated, some dissatisfaction arises from delays, affecting overall satisfaction․ The service remains a valuable asset for connecting communities, despite challenges in maintaining punctuality during peak times and events․

Planning Your Journey

Plan your trip using online tools like Moovit for real-time schedules and route tracking․ Check the 21C timetable PDF for accurate departure times and stops to ensure a smooth journey from Croyde to Barnstaple․

Using Online Tools for Trip Planning

Plan your journey efficiently using online tools like the Stagecoach website or Moovit app․ Search for the 21C timetable, track real-time bus locations, and download the PDF version for offline access․ These tools provide accurate departure times, route maps, and stop details, ensuring a seamless travel experience from Croyde to Barnstaple․

Recommended Arrival Times

For a smooth journey, arrive at least 10-15 minutes before your scheduled departure time․ This allows time for ticket purchases and boarding․ Check the PDF timetable for exact arrival and departure times, ensuring punctuality for your trip from Croyde to Barnstaple or vice versa, especially during peak hours or weekends․

Preparing for Variable Schedules

Check the latest PDF timetable for the 21C bus to plan your journey accurately․ Be aware of potential delays due to traffic or seasonal changes․ Use real-time tracking tools to monitor bus arrivals and adjust your schedule accordingly, ensuring a hassle-free travel experience between Croyde and Barnstaple․

The 21C bus service remains a reliable and essential transport link between Croyde and Barnstaple, offering convenient schedules and real-time tracking․ Future improvements aim to enhance timeliness and accessibility, ensuring continued support for North Devon’s community and visitors․

Final Tips for Using the 21C Service

Always check the latest 21C timetable on Stagecoach’s website or via the Moovit App for real-time updates․ Allow extra time for your journey and download the PDF timetable for offline access․ Use the app to track buses live and plan your trip efficiently, ensuring a smooth travel experience in North Devon․

Future Developments in the Service

The 21C service, operated by Stagecoach South West, plans to enhance real-time tracking technology and introduce electric buses for sustainability․ Future developments include expanding route coverage and adjusting schedules based on passenger feedback to improve reliability and accessibility for all North Devon commuters․

Encouraging Community Engagement

The 21C bus service fosters community engagement through regular passenger feedback sessions and social media updates․ It supports local events with extra services, ensuring reliable transport for festivals․ The service also partners with local businesses to enhance accessibility, reflecting its commitment to the North Devon community․