
The Yamaha MG12XU is a 12-channel analog mixer with 24-bit digital processing‚ 192kHz sampling‚ and 6 mono/4 stereo channels. It features D-PRE preamps‚ SPX effects‚ and USB connectivity. The manual provides setup‚ operation‚ and troubleshooting guides‚ ensuring optimal performance for live sound and studio recording applications. Available in PDF format‚ it offers detailed instructions for users to maximize the mixer’s capabilities effectively.
1.1 Overview of the Yamaha MG12XU
The Yamaha MG12XU is a versatile 12-channel analog mixer designed for professional audio applications. It offers 6 mono and 4 stereo channels‚ 24-bit digital processing‚ and a 192kHz sampling rate. Equipped with D-PRE microphone preamps and Yamaha’s SPX digital effects‚ it delivers high-quality sound reproduction. The mixer supports USB connectivity for easy computer integration and features durable construction for reliable performance in both live and studio environments. Its flexible design makes it ideal for a wide range of audio mixing needs.
1.2 Key Features of the Yamaha MG12XU
The Yamaha MG12XU features 12 input channels‚ 4-bus architecture‚ and 24-bit digital effects with 16 editable programs. It includes D-PRE Class-A microphone preamps‚ ensuring clear and natural sound reproduction. The mixer offers USB connectivity for seamless audio interface functionality and 1-knob compressors for efficient level control. Built-in SPX effects provide high-quality processing options‚ and the rugged design ensures durability. Additional features include two XLR outputs‚ RCA inputs‚ and a comprehensive manual detailing operation and troubleshooting for optimal use in live and studio settings.
Installation and Setup
The Yamaha MG12XU setup begins with unpacking and placing the mixer on a stable surface. Connect all external devices according to the manual‚ ensuring proper power supply and cable management. Power up the mixer and verify all connections for optimal performance.
2.1 Unpacking and Initial Setup
Begin by carefully unpacking the Yamaha MG12XU mixer‚ ensuring all components are included and undamaged. Place the mixer on a flat‚ stable surface‚ away from direct sunlight and moisture. Connect the power cord to a reliable electrical source‚ ensuring proper voltage matches your region. Familiarize yourself with the control panel layout and external ports. Before powering on‚ verify all connections are secure to prevent signal loss or damage. Refer to the manual for specific setup instructions tailored to your audio configuration.
2.2 Connecting External Devices
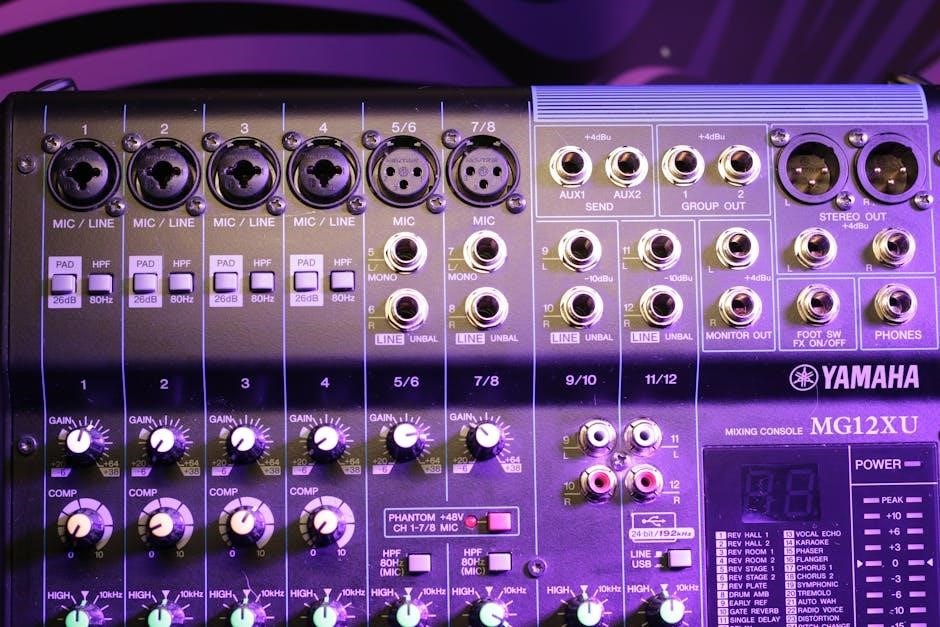
Connect external devices to the Yamaha MG12XU via its XLR‚ TRS‚ and RCA ports. Use XLR inputs for microphones or line-level sources‚ while TRS inputs accommodate line-level devices. RCA ports are ideal for connecting consumer audio equipment. Ensure all cables are securely plugged in to prevent signal loss. For digital recording‚ attach a USB device to the USB TO HOST port. Verify connections by checking the channel LED indicators. Refer to the manual for specific pin configurations and optimal setup guidelines.
Understanding the Control Panel
The Yamaha MG12XU control panel features intuitive layout with channel faders‚ EQ controls‚ and effects section. LED indicators provide visual feedback for signal levels and effects activation. The panel is designed for easy navigation‚ allowing seamless adjustment of levels‚ tone‚ and effects during live or studio mixing sessions.
3.1 Channel Layout and Controls
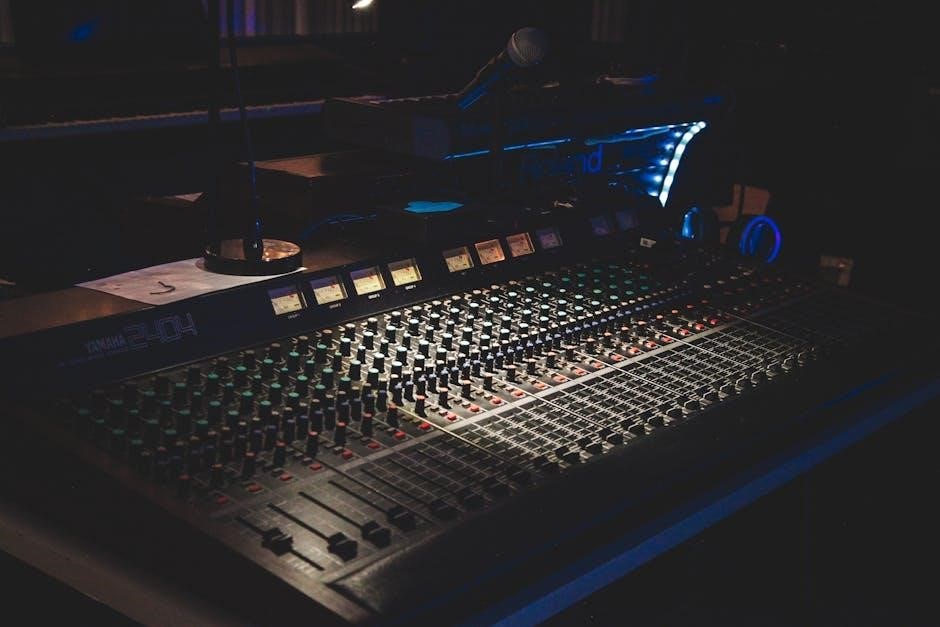
The Yamaha MG12XU mixer features a clear channel layout with 12 input channels‚ including 6 mono and 4 stereo channels. Each mono channel includes a gain control‚ 3-band EQ‚ pan knob‚ and mute button‚ while stereo channels offer level‚ EQ‚ and pan controls. The one-knob compressor on mono channels simplifies dynamic control. LED indicators provide visual feedback for signal levels and peak warnings‚ ensuring precise adjustments. The intuitive design allows for quick access to essential functions‚ making it easy to manage audio sources efficiently during live or studio mixing sessions.
3.2 EQ and Effects Sections
The Yamaha MG12XU mixer features a robust 3-band EQ on each channel‚ allowing precise tone shaping with high‚ mid‚ and low frequency adjustments. The EQ section offers a wide range of tonal control‚ with +/-15dB boost/cut capability. Additionally‚ the mixer includes built-in SPX digital effects‚ providing professional-grade reverb‚ delay‚ and chorus options. Effects are easily assignable to individual channels or the main mix‚ enhancing creativity and sound quality. The intuitive design ensures seamless integration of EQ and effects for polished audio production.
Mono and Stereo Channels
The Yamaha MG12XU offers 6 mono channels and 4 stereo channels‚ supporting both XLR and TRS inputs. This configuration provides flexibility for various audio mixing applications.
4.1 Configuring Mono Channels
Configuring mono channels on the Yamaha MG12XU involves setting up inputs for microphones or instruments. Connect your microphone to the XLR input on the mono channel. Adjust the Gain knob to optimize the input level‚ ensuring it reaches -12dB for optimal sound quality. Use the Level fader to control the channel’s volume in the mix. Engage the PFL switch to monitor the channel’s signal. Utilize the EQ section to shape the tone as needed. For external effects‚ route the signal using the AUX sends. Ensure the channel is assigned to the correct bus for proper signal routing. This setup ensures clear‚ professional audio reproduction.
4.2 Setting Up Stereo Channels
Setting up stereo channels on the Yamaha MG12XU involves configuring inputs for devices like keyboards or playback systems. Connect your stereo source to the RCA or TRS inputs on the stereo channel. Adjust the Gain knob to match the input level‚ ensuring the signal reaches -12dB for optimal performance. Use the Level fader to balance the stereo channel within the mix. Engage the EQ section to fine-tune the tone. Assign the stereo channel to the correct bus for proper routing. This setup ensures immersive‚ balanced audio for stereo sources.
Routing and Signal Flow
Routing and signal flow on the Yamaha MG12XU involve directing audio from input channels through subgroup buses‚ effects sends‚ and finally to the master output fader. This ensures a clear‚ organized audio path for professional mixing.
5.1 Understanding the Signal Path
The Yamaha MG12XU mixer’s signal path begins at the input channels‚ where audio is processed through preamps‚ EQ‚ and compression. From there‚ signals are routed to subgroup buses or directly to the main mix. Auxiliary sends allow for effects processing‚ while the master fader controls the final output; The signal path is customizable‚ enabling users to tailor routing for specific applications‚ ensuring clear and professional audio output.
5.2 Assigning Channels to Buses
Assigning channels to buses on the Yamaha MG12XU allows for flexible audio routing. Channels can be sent to subgroup buses (1-4) or directly to the stereo bus. Press the bus assign buttons to select the desired destination. This feature enables users to group channels for processing or mixing‚ such as grouping drums or backing vocals. The process is straightforward‚ with LED indicators showing the assigned buses. This customization ensures efficient mixing tailored to specific live or studio applications‚ enhancing overall sound quality and workflow.
Effects and Processing
The Yamaha MG12XU features built-in SPX digital effects‚ including reverb‚ delay‚ and chorus. It also supports 24-bit digital processing‚ enhancing sound quality with professional-grade effects and precise control.
6.1 Using Built-In Effects
The Yamaha MG12XU features a suite of built-in SPX digital effects‚ including reverb‚ echo‚ delay‚ and chorus. These effects can be easily accessed and adjusted via the control panel. Users can select from a variety of preset effects and customize parameters such as level‚ time‚ and tone to achieve the desired sound. With 24-bit processing‚ the effects deliver high-quality audio enhancement‚ making it ideal for live performances and studio recordings. The mixer also supports up to 16 different effects‚ providing versatility for diverse applications.
6.2 Adjusting Effect Parameters
The Yamaha MG12XU allows precise adjustment of effect parameters to tailor the sound to your needs. Users can modify settings like reverb time‚ delay feedback‚ and chorus depth directly from the control panel. The intuitive interface ensures easy navigation‚ enabling real-time adjustments during live performances or studio sessions. With clear visual feedback‚ you can fine-tune effects to enhance your audio without compromising quality‚ ensuring professional-grade sound customization for any application or environment.
Troubleshooting Common Issues
This section addresses common problems like audio dropouts or LED blinking‚ guiding users through diagnostic steps and solutions to ensure smooth mixer operation and maintain performance quality.
7.1 Resolving Audio Dropout Issues
Audio dropouts can occur due to connection problems or incorrect settings. Check all cables for damage or loose connections. Ensure gain levels are optimal‚ avoiding clipping. Reset the mixer if necessary. Update firmware to the latest version. Consult the manual for detailed troubleshooting steps. If issues persist‚ contact Yamaha support for assistance. Regular maintenance and proper setup can help prevent such problems‚ ensuring reliable performance during live or studio use.
7.2 Fixing LED Blinking Problems
LED blinking on the Yamaha MG12XU may indicate errors or system activity. If the PFL-LED blinks continuously‚ check if the PFL button is pressed or stuck. Reset the mixer by powering it off and on. Ensure firmware is updated to the latest version. Consult the manual for specific LED error codes. If issues persist‚ contact Yamaha support for professional assistance. Proper diagnosis and timely fixes can prevent operational disruptions during live performances or recordings.

Downloading and Accessing the Manual
The Yamaha MG12XU manual is available for free PDF download on Yamaha’s official website. It includes Owners Manual and Technical Specifications‚ providing detailed guidance in English.
8.1 Finding the Yamaha MG12XU Manual Online
To find the Yamaha MG12XU manual‚ visit Yamaha’s official website at download.yamaha.com; The manual is available as a free PDF download‚ including the Owners Manual and Technical Specifications. These documents provide detailed instructions for setup‚ operation‚ and troubleshooting. Ensure to select the correct model‚ MG12XU‚ from the website’s search options. The manual is available in multiple languages‚ with the English version being widely accessible for users worldwide.
8.2 Navigating the PDF Manual
The Yamaha MG12XU PDF manual is organized for easy navigation. It includes a detailed table of contents with hyperlinks to sections like installation‚ features‚ and troubleshooting. Users can navigate via bookmarks or search for specific keywords using the PDF reader’s search function; The manual is divided into clear chapters‚ ensuring quick access to information on setup‚ controls‚ and technical specifications. This structure allows users to efficiently locate guidance on any aspect of the mixer’s operation and configuration.

Additional Resources and Support
Yamaha offers extensive support through official downloads‚ community forums‚ and user guides. Visit the Yamaha website for manuals‚ drivers‚ and software updates. Engage with forums for troubleshooting and tips from experienced users‚ ensuring optimal use of your MG12XU mixer.
9.1 Yamaha Official Support and Downloads
Yamaha provides comprehensive support for the MG12XU mixer‚ including downloadable manuals‚ technical specifications‚ and software tools. Visit the official Yamaha website to access the Owner’s Manual‚ Cubase AI download information‚ and driver installations for Windows. Mac users benefit from pre-installed drivers. Additionally‚ Yamaha offers customer support through their corporate offices and ensures regulatory compliance with FCC and European standards. These resources ensure seamless operation and troubleshooting for optimal mixer performance.
9.2 Community Forums and User Guides
Community forums and user guides provide valuable resources for Yamaha MG12XU users. Platforms like HelpOwl.com offer immediate support‚ addressing common issues such as blinking PFL-LEDs. Additionally‚ user manuals in multiple languages‚ including Italian and French‚ are available online. These resources‚ combined with downloadable PDF guides‚ foster a supportive community and ensure users can troubleshoot and optimize their mixer effectively‚ regardless of their location or language preferences.
Summarizing the Yamaha MG12XU mixer’s key features‚ including its 12 channels‚ 24-bit processing‚ D-PRE preamps‚ and SPX effects‚ the manual ensures effective use in live and studio settings‚ making it a versatile tool for audio professionals and enthusiasts alike.
10.1 Summary of Key Features
The Yamaha MG12XU mixer offers 12 channels with 6 mono and 4 stereo inputs‚ 24-bit/192kHz digital processing‚ and D-PRE microphone preamps for clear sound. It includes SPX digital effects‚ USB connectivity for audio interface functionality‚ and a rugged design for durability. With flexible routing options and high-quality components‚ the MG12XU is ideal for live sound‚ recording‚ and installations‚ providing professional-grade performance in a compact and user-friendly package.
10.2 Final Tips for Optimal Use
To maximize performance‚ regularly update the firmware and use original Yamaha accessories. Ensure proper cable management and maintain a stable operating environment. Always refer to the manual for specific setups and troubleshooting. For advanced customization‚ explore Yamaha’s official support resources and community forums. Proper maintenance and adherence to guidelines will ensure longevity and optimal functionality of your MG12XU mixer.